So you've either started your own blog or wish to start one. Your main question might be how to write a blog post. You're not alone. Many people ask this question.
The good news is there is a proven formula that ensures each post you write will have the greatest success to move up in the search engines and get read.
After all, you're doing this to get traffic, right? And as you know, traffic means money!
So, let's get started.
How to Write a Good Blog Post in 13 Easy Steps
These steps on how to write effective blog posts are all in order so following along is easy.
4. Create a Great Hook For Your Intro
6. Write Like You're Talking to a Friend
7. Make Your Content Skimmable
Step 1: Choose a Topic
When choosing a topic for your blog post, you always should think about your reader.
Blogs in 2024 are no longer about your daily activities such as what you did today and what you plan on doing tomorrow. People just don’t care. This is how people wrote blogs in the beginning. Nowadays, it’s a much different beast.
I’m assuming that since you are here, you want to make money from your blog. Your posts have to attract an audience and give them what they want. Most people are going to look for “how-to” type articles, reviews, and “best of” type posts.
You can still let your personality shine through your blog posts even if they are posts that are monetized with affiliate links. The only page on your blog that should be strictly about you is your “About Me” page.
This is where you can write all about yourself, what a typical day looks like, talk about your pets, credentials, or anything like that. The rest of your blog is going to be dedicated to helping your readers.
Hopefully, this is very clear and you have an overall view of how your blog content should be structured. Now it’s time to choose a topic.
Look to Your Competition
The best place to find good blog post ideas is to find similar blogs to yours. Identify the following:
There’s no better place to get topic ideas from your competition. This is especially true for Blogs at been around for years. A blogger that has been around for a while understands his or her audience, keeps their readers interested and knows what they want.
The first rule of content creation for a new blog is to focus mainly on informational-type articles.
For example, if your blog is about dogs, you might want to write articles about dog grooming, dog diets, how to wash your dog, how to train your dog, Etc.
Stay Away from Promotional Topics at First
You don’t want your first articles to be promotional such as, the best dog food, Royal Canin review, best dog collars, etc. With no other content, people will not trust you. You need to build up trust first and you can do this by helping them. You do this with informational-type posts.
Informational articles are actually very easy to write. The review, and product comparison type posts are the most difficult. So why not start with something easy, right?
Getting back to your competition, identify all their informational-type posts, write down all the titles, and then you’ve got your first bunch of topics to write about. Done.
Your first blog post and the next 10 or so that follow should be strictly informational. However, before you do this, make sure you read step 2 on keyword research.
Step 2: Do Keyword Research
So by now, you have brainstormed some ideas for the informational type articles that your competitors have.
You will soon realize that not all informational articles are the same. Yes, the topics will be different, but the search volume for each of these topics can be drastically different.
Note:
The higher volume of searches, the more difficult it will be to rank.
I would stick to topics that are easier to rank. You do this by focusing on long tail keywords.
Lots of keywords are essentially keywords that are three words or more. To give an example, if your blog is about gardening, a long tail keyword could be “how to know when tomatoes are ready to be picked”. Usually, informational types of keywords are longer tail anyway, as opposed to promotional keywords such as best garden hoe.
One tool I recommend for keyword research that is incredibly cheap is Keywords Everywhere. This tool used to be free but due to abuse, the creators had to make it a paid tool. $10.00 worth of credits could last your first six months or more. It’s so much cheaper when you compare it to other tools like Ahrefs which starts at $99.00 a month.
There are other keyword tools out there and you are welcome to use anyone you wish.
Just make sure it has some keyword volume. Starting at 10 searches per month or more should be a good starting point. The whole idea is to get going with content. Even if it’s very competitive, as long as you stay on topic and provide value without doing any promotions, you will be rewarded in time.
Search engines like Google don’t want to see new blogs doing promotional posts only. This is evidenced in their latest update for affiliate websites.
Typically, your blog should have slightly more informational-type of articles rather than promotional ones. There’s a great video that Matt Diggity did about this and you can see it below.
When you start to write your promotional type articles where you’ll be including affiliate links to products that you are recommending or comparing, your keyword tool will come in especially useful.
If your blog is new, your chances of ranking for a very competitive term is low. so I would at first focus on product keywords that have lower competition.
Following these rules, you should be able to pick out some great keywords to use for your articles. It will also help define your target audience.
Step 3. Create an Outline
Once you have your topic and the keywords you want to focus on, it's time to create an outline. This is a very important step because it will help you stay on track when writing your article.
Creating an outline is simple, just list down all the main points that you want to talk about in your article.
For example, if your article is about "How to Start a Garden", your outline could look something like this:
- Decide on the type of garden you want to start
- Choose the location for your garden
- Prepare the soil for planting
- Select the plants or seeds you want to grow
- Plant your garden
- Water and care for your plants
- Harvest your crops
As you can see, each main point represents one paragraph in your article.
You don't have to worry about writing in complete sentences at this stage, just jot down the main points you want to cover.
Once you have your outline ready, it's time to move on to the next step.
Step 4: Create a Great Hook For Your Intro
The first paragraph you write is the most important one when writing blog posts. If you don't attract your reader's attention here, they will likely not read any further.
This is why it's important to have a great "hook" in your intro.
A hook is simply a sentence or two that grab's your reader's attention and makes them want to read more.
There are several different types of hooks you can use, but for the purposes of this article we'll focus on three:
You don't have to use all three, just pick the one that you think will work best for your particular article.
For example, let's say we're writing an article about gardening for beginners. We could start our intro with a surprising fact, like this:
"Did you know that gardening is one of the most popular hobbies in the world? In fact, over 36 million households in the United States alone have some type of garden."
Or we could tell a personal story about our experience with gardening, like this:
"I remember when I was first starting out with gardening. I had no idea what I was doing and made so many mistakes! But with a little patience and trial and error, I eventually got the hang of it and now I enjoy spending time in my garden every chance I get."
Finally, we could ask a question that our readers might be wondering about, like this:
"Have you ever thought about starting a garden but didn't know where to begin? If so, then this article is for you!"
Once you've written your hook, you can move on to the next step.
Step 5: How to Write Your Content
Now we get to the fun part where you start writing!
Start with your Title Tag
Your content starts with the Title tag for your new blog post. There is a difference between the H1 tag and the title tag. The title tag is what will appear in the search results in Google.
You want to make this under 70 characters so it fully displays. If it is too long, it will get cut off.
You can use this free tool by Moz to make sure your title tag gets fully displayed.
You must include your keywords in the title tag.
For example, if your keyword is "best baseball gloves", You will include that along with other relative keywords.
This would have been covered in your keyword research already, but to give you an example I typed "best baseball gloves" in Keywords Everywhere and got this result (only partially revealed to save space!)
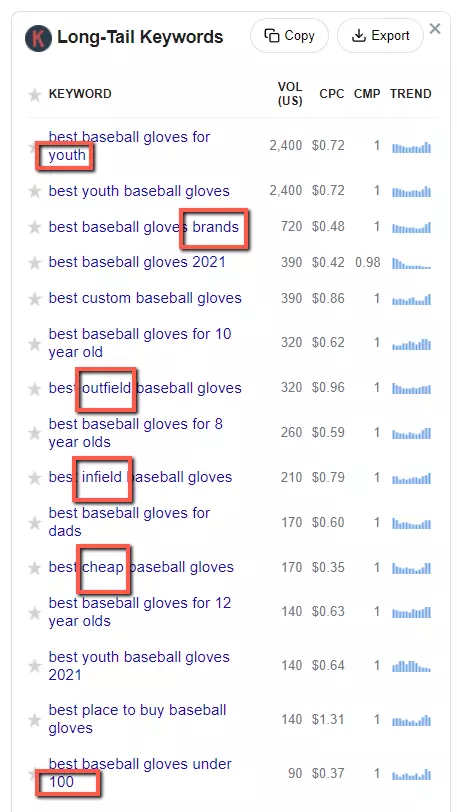
Notice there are other supporting keywords like youth, brands, outfield, infield, cheap, 100, and more.
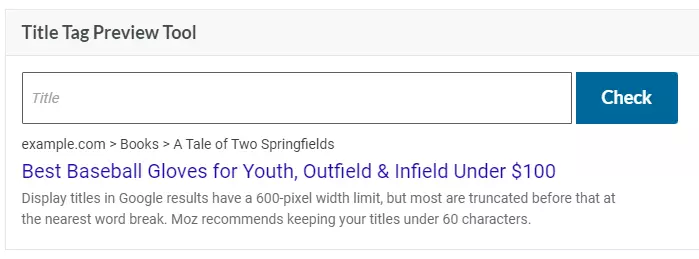
Now, if your article covers all baseball gloves, you could write something like "Best Baseball Gloves for Youth, Outfield & Infield Under $100.
When I run this through the Moz tool I mentioned earlier, it's under 70 characters and will be fully displayed in the search engines. See below:
If it can fit, you should even include the current year. Be sure to keep the year current, by editing your article and title tag.
So where do you do this?
I hope you are using WordPress for your blog. If not, whatever platform you are using can help you if you're not sure.
WordPress is the most popular content platform online, so you should really be using it. Anyway, I digress!
You'll need to install the Yoast plugin which I will be using for this example. There are other plugins like Rank Math which are just as good, but I prefer Yoast because I've been using it for years.
To start, you will go to your WordPress dashboard and navigate to "Posts" then "Add New".
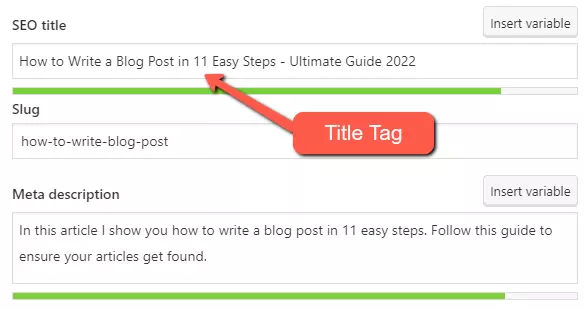
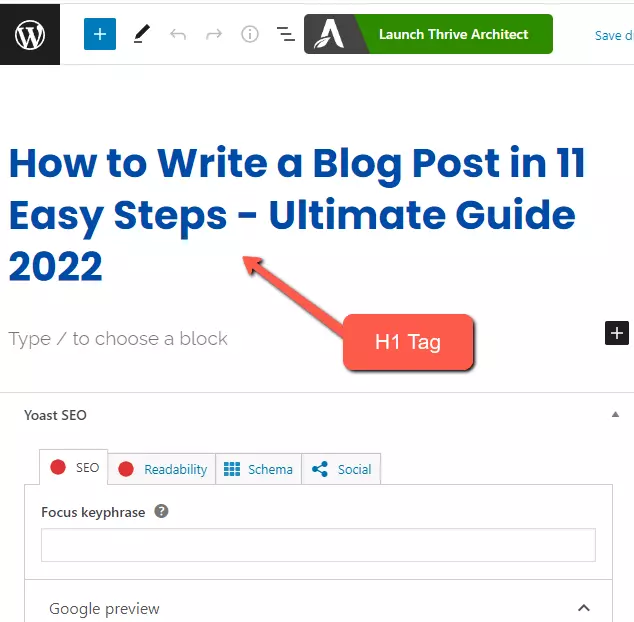
Here is where you will write your title tag. This is the title tag for the exact post that you are reading right now.
Write Your H1 Tag
The H1 Tag is different than a title tag and these often get confused. The H1 tag is essentially your blog post title. The H1 tag can be the same or different than your title tag. I recommend keeping it the same or at least very close with a slight difference.
Here is where you would type in the H1 tag.
Create Your Slug
A slug (not the Mollusk!) is part of your entire URL's blog post. It will appear after the domain name. For example, for this blog post, the slug is "how-to-write-blog-post"
You should ALWAYS include your main keyword in the slug. There's no reason to include supporting keywords as you would use in the title or tag with the example I gave you above.
The reason for this is simple. Over time you might need to make edits to your blog post. If you include the year in your slug, that's going to be a problem. You can't change the slug, but you can change the Title and H1 anytime.
Make your slug simple and targeted to the main keyword only.
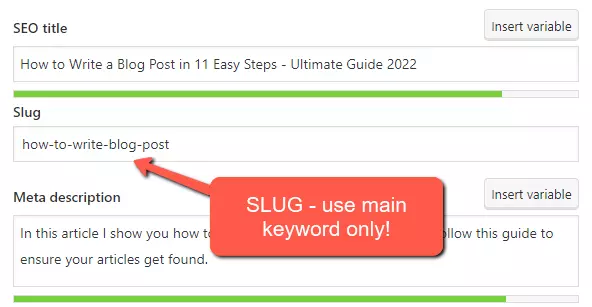
You might have noticed the slug is missing an "a", as in "How-to-write-a-Blog-Post". This is because it's not necessary as Google will still understand what your page is about without the A. You can still use it, but just know that it won't matter.
The slug is more for the search engines rather than for humans. Your title tag and H1 will be written for humans so it's readable.
Write Your Description
Your description or "meta-description" helps the search engines understand further what your blog post is about. It's not 100% necessary, but just be sure to use it. If you don't Google will choose a description based on your content in the article.
Your description should also be keyword rich, but don't overdo it. Your description should be more of a "hook" because people will be able to read it the search engines. It serves as a brief summary of what your post is about.
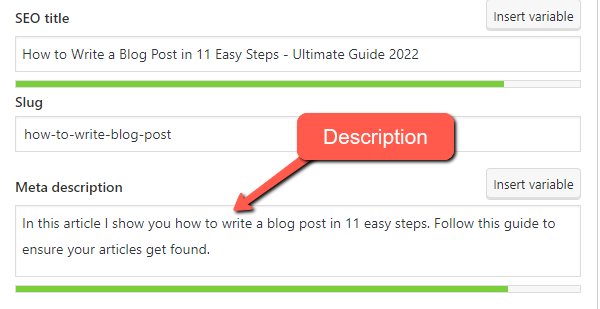
Now that you've got your Title Tag, H1, slug, and description set up, also known as metadata, it's time to finally write the actual content.
Step 6: Write Like You're Talking to a Friend
When writing your content, don't be a robot. Write as you would talk to a friend.

Use contractions, and natural language, and don't be afraid to show some personality and show your own writing style. This will make your content more relatable and enjoyable to read.
Your goal is to connect with your audience on a personal level so they keep coming back for more. That's how you create a great post.
And whatever you do, don't try to sound like an expert if you're not one. It's obvious when someone is faking it and it will only hurt your credibility in the long run. Just write like a normal person and you'll be fine.
Your number one goal is to build rapport with your audience. When you do that, you build trust. This means they will trust your advice when it comes to your promotional posts where you recommend affiliate products.
Writing for the Search Engines
At the same time, you need to write for the search engines too. For an effective blog post, you need to strike a balance between writing for your audience and writing for SEO - search engine optimization.
To write for the search engines, you already have learned how to cover that for the title, H1, and description tag.
Your content should include as many keywords as you can that are relative to the article. However, do NOT keyword stuff your article.
Don't use your main keyword too much. In blog writing, write naturally and include the keywords where they fit. Even if you use them just once, that's totally fine.
Step 7: Make Your Content Skimmable and Easy to Read
Your content should be easy to read.
Use short paragraphs, headlines, bullet points, bold text for important points, and images to break up your text.
This will make it easier for readers to digest your content and come back for more. No one likes to read big blocks of text. It's hard on the eyes and it will get ignored. Limit your paragraphs to 3-4 sentences at most.
When most people read your blog post, they likely won't read it word for word. I know this might sound insulting to you because of all the work you put in, but it's a reality.
People are busy these days and want to digest as much as possible in the shortest amount of time.
Your blog post should be scannable. Yoast even has a "readability score" built right in so you can use that as well. However, you will be your best judge. Or, you can have a friend read it and get your feedback there.
Having a table of contents is also a good idea, so people can find what they want to read first without having to scan the entire article. Short articles don't really need one, but for longer ones, you might want to consider them.
Step 8: Use Images
Every blog post should use images for a variety of reasons.
First, it will make your blog post look better and more appealing.
Second, you can use images to break up your text which makes it easier to read.
And lastly, you can use images to drive traffic from Google Image search. Just make sure you're using keywords in the file name and fill out the alternate text field with a brief description of what is in the photo along with your target keyword.
You should be able to find free photos online that you can use for your blog posts. I use a variety of images from different sources, some are paid, and some are free. For paid images, I like using Adobe Stock.
I also have a subscription with Canva which includes some good images and illustrations as well. They also have a free version that includes some decent images.
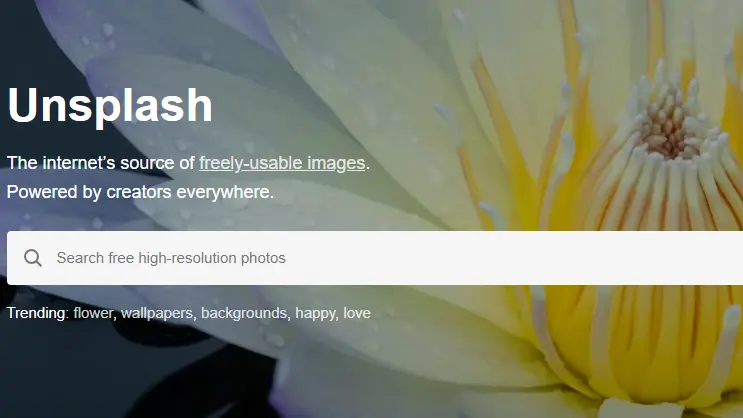
You can get free images from sites like Unsplash, Pexels, and Pixabay.
Resize Your Images
It's important to use the correct size image in your blog post.
Images that are too small will look blurry and low quality. Images that are too large will take up too much space on the page and make your blog post load slowly.
The image size will depend on the theme you are using. Just find out what the maximum horizontal pixels are and don't exceed that for images. For my blog that you're reading, it's about 800 pixels max, but yours might be different.
You can resize images with photoshop or a free online image resizer.
Compress Your Images
After getting your images the right size, be sure to compress them as well. This will help them load faster on your blog post. This is especially important for rankings as page speed is a ranking factor when it comes to Google.
You can use a free online image compressor like TinyPNG to compress your images for the web. Just upload the image and then download the compressed version.
Make sure you don't compress your images too much though or they will become pixelated and low quality. You want to find a balance between file size and quality.
More and more people are using WebP for compression because it retains quality and the file size is smaller than jpeg. I use WebP for all my images now.
For WordPress, you can also install an image compression plugin like Smush to help optimize your images further.
Step 9: Add a Featured Image
Your blog post should include a featured image. This is the image that will show up when someone shares your blog post on social media or if it gets picked up by Google News.
The featured image should be related to the topic of your blog post and it should be a high-quality image.
I like to make my featured images at least 750px wide and use Photoshop or Canva to design them. Sizing may vary with the type of theme and layout you use. Be sure to size and compress this image as well, but not too much so you don't sacrifice quality.
Step 10: Include a Clear Call to Action
You're creating a blog to make money right? On your promotional posts - the ones that include affiliate links, you need to have a clear call to action.
A call to action is simply telling your reader what you want them to do next.
It could be something like "Buy Now", "Read More", or "Sign Up Here".
Just make sure it's big, bold, and easy to find. You don't want people having to search for the link or button.
If you're not promoting anything on your blog post and you're just trying to get people to read it, then your call to action could be something like "Continue Reading" or "Click Here To Read The Rest Of The Article".
Step 11: Do final edits and Check Grammar/Spelling
Before hitting publish, you must be sure that the article is free from any grammar or spelling errors.
I like to use the free Grammarly extension to help with this. It will scan your blog post and highlight any errors for you to fix.
It's also a good idea to have someone else read over your blog post as well before you hit publish, just to get a second set of eyes on it.
You should also check for plagiarism. We all make mistakes and you may have inadvertently copied someone else's content in your post. I use Copyscape to ensure every post I write is free from plagiarism. You should too. It's a paid tool, and $10 gets you enough credits to last you several months depending on how much you write.
Once you're happy with everything, then you can go ahead and hit that publish button!
Step 12: Publish Your Post
You're almost at the finish line.
Now it's time to publish your post which is the easiest step.
In WordPress, you simply click on "Publish" and then choose the date and time you want it to go live.
You can also schedule your post to publish at a later date which is great if you like to batch write your content or if you're going on vacation and won't be able to post for a while.
Just keep in mind that once you hit publish, your blog post is out there for the whole world to see!
Updating Your Published Posts
Once your post is published, it's not something that you'll just walk away from. You should be updating your post at least every 6 months. This is because the internet is constantly changing and you don't want your post to become outdated.
For example, if you have a blog post about SEO and you wrote it in 2020, a lot has changed since then and you'll need to go in and update the post with the latest information.
If you don't update your posts, then people will stop trusting your content and they won't come back to read your blog. A good blog post is one that is fresh and has a good content marketing strategy. Keep this in mind when hitting publish!
Step 13: Promote Your Post
The final step is promoting your newly published blog post. If no one knows that it exists, then how will they be able to read it? 🙄
There are many ways that you can promote your blog post. The most common way is through social media.
You can share your post on Twitter, Facebook, Instagram, and any other social media platform that you're active on. You can also share it in relevant Facebook groups or forums.
Another great way to promote your blog post is through email marketing. If you have a list of subscribers, then you can send them an email letting them know about your latest post.
You could even create a graphic for Pinterest and include a link to your blog post. There are endless possibilities! Just get creative and make sure people know that your blog post exists!
Need Some Formal Training?
Although you pretty much have everything you need in this guide on how to write a great blog post. However, in order to be successful, there are many other things to consider such as SEO, backlinks, site speed, keyword research and more.
Affiliate marketing courses can help you put this altogether. Sure, you can find free resources online to help with your blog, but if you want a fasttrack to success, you should consider getting a course. I've reviewed many courses and only suggest the best ones. Do consider it!
Conclusion
That's it! You are now well equipped on how to write a successful blog post in 13 easy steps. Just remember to be creative, write like you're talking to a friend, use lots of images, promote your post, and update it regularly.
If you follow these steps, then you'll be well on your way to becoming a successful blogger!
Do you have any tips on how to write a great blog post? Share them in the comments below!
Enjoyed this article? Share it with your friends!
- Best Ways to Make Passive Income on YouTube - April 15, 2024
- How I Make Faceless YouTube Channels With AI - April 9, 2024
- Top 21 Faceless YouTube Niches to Earn Big Profits in 2024 - April 3, 2024

Hi drew your site is a revelation to me about where I can start an online business. It is honest and straightforward. I am from the older generation before internet was around and I hope to start a new beginning with your guidance.
Regards. Dave.
Thank you Dave! I am glad you find my content useful. Just because you’re from an older generation does not put you at a disadvantage. Anyone can do this if they apply themselves 🙂