Blogging has made average people with no prior experience with internet stuff very wealthy. It's enabled them to quit their jobs and travel the world. Myself included. 🤑
So, Is this something you want for yourself?
In this guide, I will walk you through the seven easy steps you need to take to create a successful blog powered with affiliate marketing.
How do blogs make money?
Blogs make money a few ways. The easiest is with affiliate marketing. With affiliate marketing, you are promoting other people's products and if someone buys from your link, you will earn a commission. Links are placed strategically within your content.
Another way is through advertisting. There are companies like Mediavine, AdThrive, Ezoic, etc, that will put ads on your pages. When these pages get views, you earn money that way as well.
You can also sell your own products such as online courses, digital downloads etc.
However, the easiest and most profitable is with affiliate marketing.
In this article I am going to show you how to free yourself from the 9-5 so you can live your life on YOUR terms!
I'll cover everything from choosing a domain name to picking a niche and setting up your website.
So whether you're a complete beginner or just need a refresher course, if you follow these 7 steps (with video help too) I promise to make it as painless as possible!
Before we start, I want to address something.
Blogging in 2025 is much different than it was in the 2010's. I see many articles that use outdated tactics and just simply don't work anymore.
In this guide, you're going to get the freshest info on how to start a blog in 2025. I've researched over 17 successful blogs, some making over $100K a month, and found out what the secret formula is for success.
I've also created blogs and this one, in particular, has made over $521,000 to date. So yes, I'm familiar with what works and I put it into practice.
7 Steps to Start a Blog
So let's get started!
1. Choose Your Blog Niche and Name
I know the first question you will likely ask is what niche to pick for your blog. There are a few schools of thought on this.
You could write about:
Your Life Experiences
Everyone has a unique life experience that they can share with others. If you can help somebody with a particular problem or guide them in a direction to help them achieve our goals and I could be a suitable topic for your blog.
It could even be related to your line of work. Many people start blogs based on their work experience because they know they can monetize it.
Need a hand picking a niche? Check out these best affiliate marketing niches!
A Personal Blog
You can also write a blog about your daily life. This can include things you do in your daily life, your work, what you do on the weekend Etc. For example, if you are a stay-at-home mom, you could write about your daily experience as a mother.
Mommy Blogs are actually very popular nowadays. On the flip side, if you’re a stay-at-home dad, well there you go. If you work from home, you can write about your experiences about what it’s like to work from home.
Your Hobbies
Hobbies are great to write about. The subject matter comes easy to us because it’s something we are passionate about.
Chances are there other people that share your interests. Or, they know very little about the subject matter but your blog can help them. Topics can range from model airplanes to cooking, sports, fashion, make up Etc.
You as a Brand
The important part that you need to understand here is that whatever your blog is about, it’s you that will be your brand. People like to be able to relate to other people. It’s not just about the content.
You need to have people relate to you in order for your message to get across. Think of it this way. Would you take advice from a friend or a stranger? People need to be able to trust you and trust comes from branding yourself as an authority in your space. You need to be humble yet show that you know what you’re talking about.
If you can establish a rapport, people will be more likely to buy products you recommend from you. Usually, this is in the form of affiliate marketing where you make a commission from products you recommend.
Choosing Your Blog Domain Name
Choosing your blog's domain name can be very simple by just using your name. If it's taken, you can try including your middle initial.
If that doesn't work, you can use your first name + the niche. For example, PetersFishing or LisaStayatHomeMom. You get the idea. If you don't want to use your name, you can just use something that identifies your niche.
Don't complicate it. Keep it simple. The name of your blog doesn't have to be specific. Try keeping it as short as possible too.
2. Set Up Your Blog
You will be setting up a WordPress blog. WordPress is the industry standard and is the best blogging platform - period. Google loves it. Readers love it. There are hundreds of plugins available to customize it. Just use WordPress.
Your Domain Name
I am sure you have seen hosts offering you a free domain name when you get a hosting account.
Please, Please, Please do NOT fall for this.
While getting a "free" domain name sounds enticing, you will still need to pay to renew it a year later. But, there's much more to this.
If you want to have domain privacy and protection, you will need to pay the host on average about $1 a month. Normally this is paid up-front, so add another $12 for your first year of hosting.
What is domain privacy and protection?
This hides your personal information from the whois database. To illustrate this, go to whois.com and enter a domain name. If the domain does not have privacy enabled, then your name, address and phone number will be displayed if someone searches for your site.
Below is an example of a domain with privacy enabled. None of the info matches the personal info of the registrant. If you didn't enable privacy, your details would be shown here.
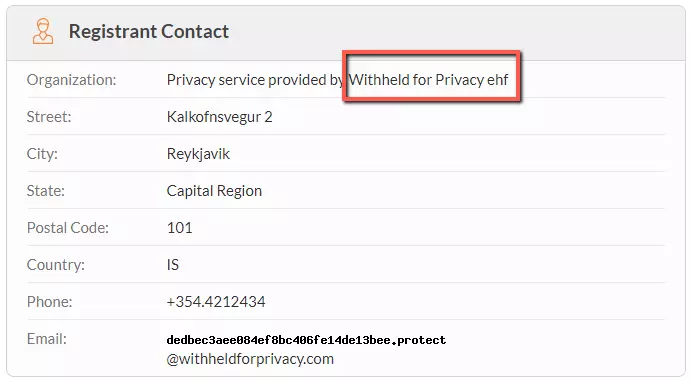
With domain privacy, your personal information remains confidential and is not shown.
If you get a domain with Namecheap for example, domain privacy and protection come free for life. Sure, you have to pay for the domain, but if you add the "Honey" extension, you can even get a further discount.
If you don't have a Namecheap account, check their homepage as sometimes they have specials for .98 cent .com domains.
You can see here I just entered a gibberish domain name and it would cost me $8.98 for the year. I used the HONEY extension to get this deal. If you paid the host for domain protection, it would cost you an additional $12 a year. So that free domain doesn't really look good anymore, does it? It ends up costing you more!

Another reason to get a domain outside of the host is that if you decide to change hosts, later on, it’s much easier if your domain name is registered with a registrar like Namecheap.
Sometimes hosts will give you a hassle if you register the domain with them, so don't do it!
Things to Consider When Choosing Your Domain Name
Now That You Got Your Domain, It’s Time to Get Web Hosting
Here are the steps you will need to take:
1. Click here to get a discount on Bluehost. I use Bluehost myself for blog hosting and my readers get a special deal. It's only $2,95 a month. That's $35.40 for the entire year.
2. Choose "Hosting" at the top, then click "Shared Hosting". Click "Get Started"
3. Choose the Basic, Plus or Choice Plus (Basic is just fine)
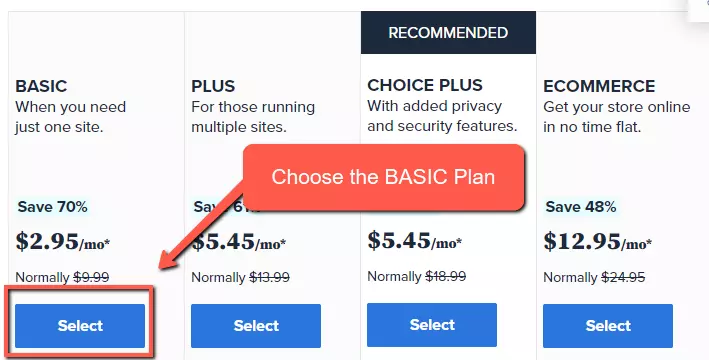
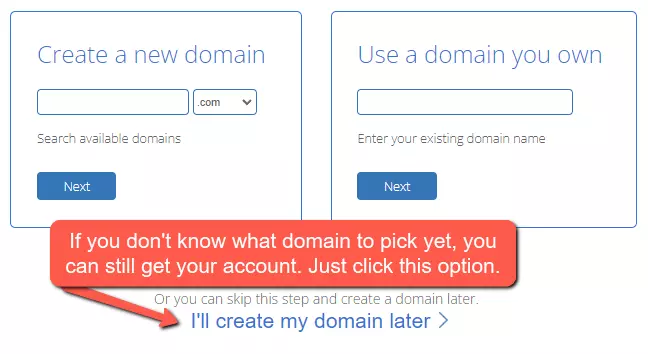
4. If you took my advice and got a domain with free privacy from Namecheap, enter it in the second box labeled "Use a domain you own".
If you don't care about privacy and understand the risks I mentioned above, just enter a domain under "Create a new domain".
**If you don't have a domain name yet, you can choose one later by clicking "I'll create my domain later"
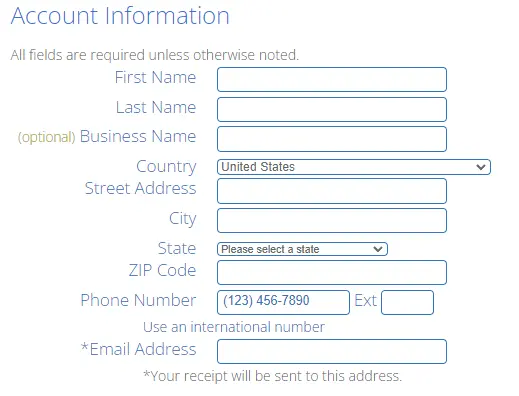
5. Enter your account information
6. Choose the account plan (Basic is all you need)

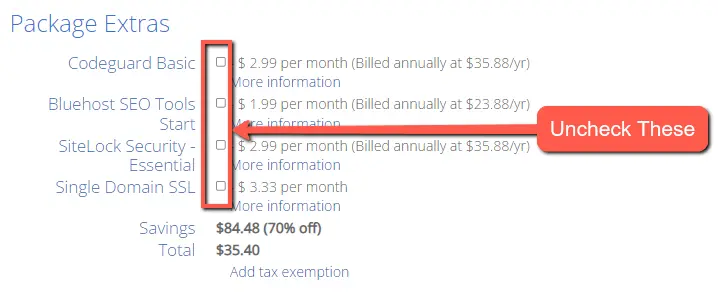
7. Uncheck package extras. You don't need any of these.
Note: If you decided to get the free domain with Namecheap, the option to buy domain privacy will appear at .99 cents a month. It's advisable, but it's cheaper (and better) to get get a domain with Namecheap and get the free domain privacy and protection included with the domain.
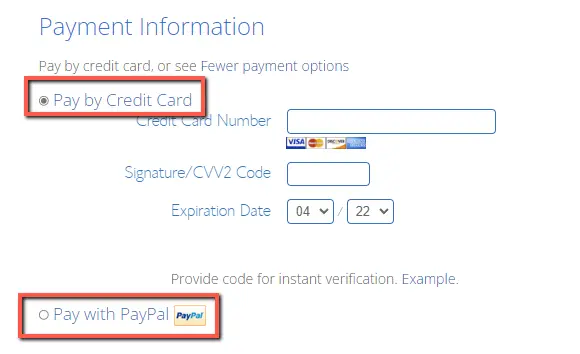
8. Complete your purchase. You can pay with either credit card or Paypal.
9. Answer or skip the onboarding questions. Choose “BLOG” at the prompt.
10. When asked to choose your theme, click “SKIP” (I will explain why later)
11. Click the WordPress button from the Bluehost dashboard – you will then be taken to WordPress
😃 You now have a self hosted WordPress blog from Bluehost!
3. Install WordPress
Bluehost will automatically install WordPress for you - there's very little effort on your part. It's now time to configure your WordPress blog.
When you're in the dashboard, it will ask you to pick a theme.
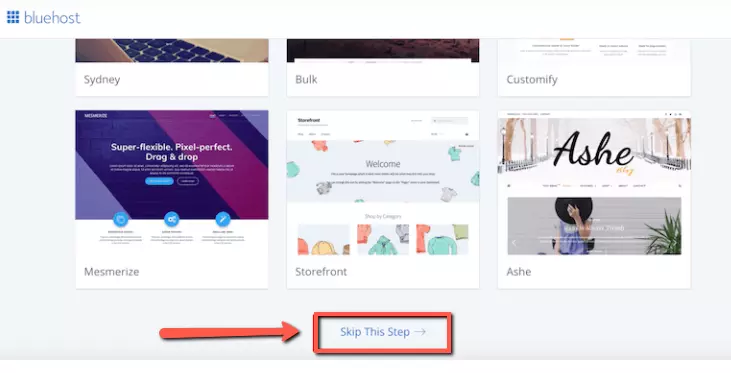
You can choose a theme here if you wish, but you can click the button "Skip this Step" at the bottom. I'll give you some good suggestions on where to find free and premium themes that are best for blogging.
Remember, you can always change your theme. So even if you choose one here, that's perfectly fine.
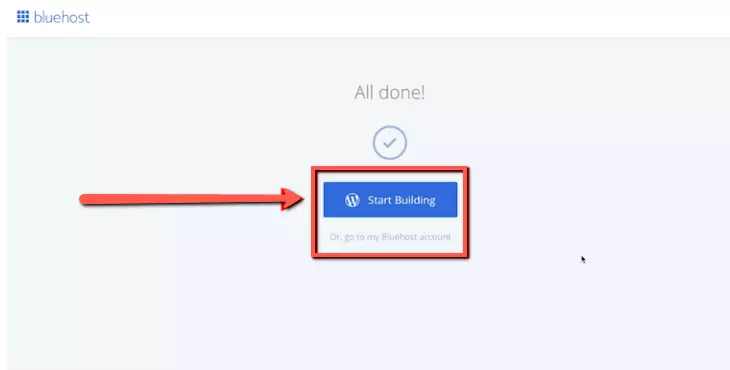
Next, you are going to click where it says "Start Building".
The next step is to choose what kind of WordPress blog you want to create. You can choose between business or personal.
WordPress can help you decide by choosing either one, but I suggest just clicking "I don't need your help" which will take you to your dashboard.
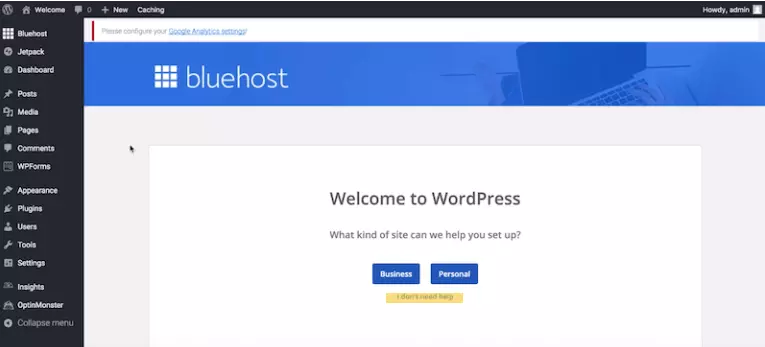
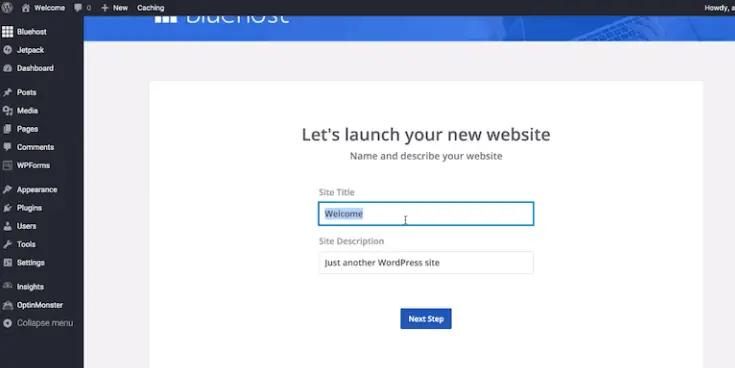
The last step is to enter "Site Title" and "Site Description". For your site title, keep it under 70 characters. You can use this guide here. For the description, keep it under 160 characters.
The next step in setting up your blog is choosing a theme. You can ignore this step if you already have a theme in mind or installed it in the previous step. If you want to change it, just go to "Appearance" then "Themes" and change it from there.
4. Choose a WordPress Theme for Your Blog
A WordPress theme is a group of files that include style sheets, graphics and code. These will dictate the overall appearance of your website or blog.
If you haven't installed a theme yet, WordPress automatically supplies a default one that might look like this:
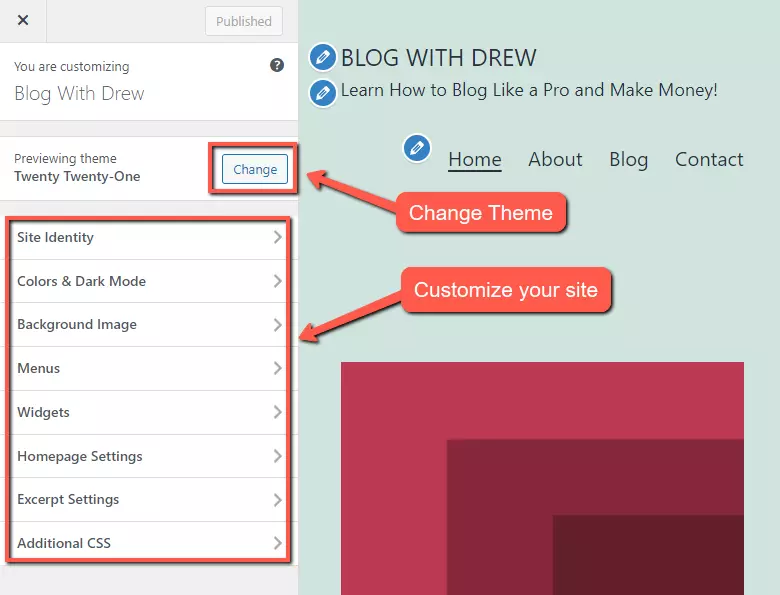
You can customize your site and change the theme when going to your dashboard and clicking on "customize" at the top as seen in the illustration above.
What you're seeing here is a free, default theme.
They are perfectly fine, but paid themes are coded better, have much more options and the best part - offer free support. Trust me, I consider myself an advanced WordPress user and from time to time I contact my theme's support. By the way, I use Generate Press.
You can also check out ThemeIsle for more free and paid themes. There are a ton of great ones on there.
Once you have decided on a theme, this is how you can install it:
1) Log into your WordPress admin page. You can get to it by typing in the address bar - yourdomain.com/wp-admin. If you forget your password, you can reset it here as well.
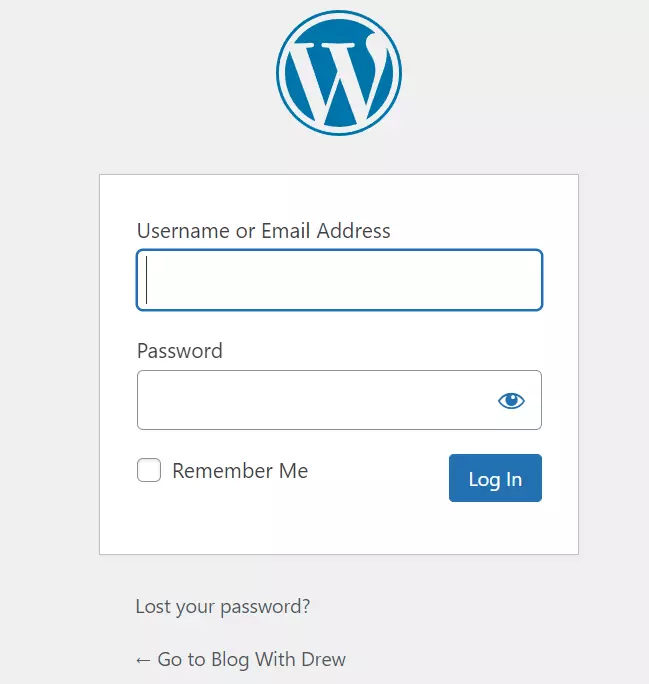
When you login, you'll see all the different items in your WordPress dashboard on the left hand side.
Look for "Appearance". Below that, you'll see "Themes". Click on Themes.
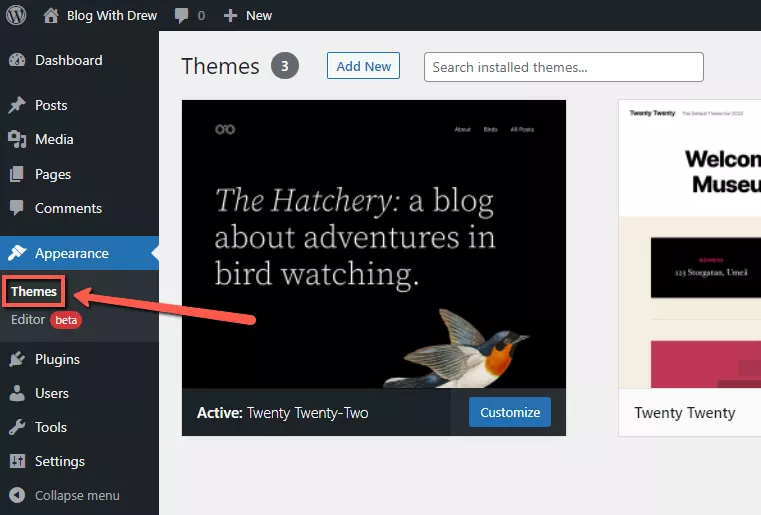
Next, click on the button "Add New". This will allow you to see different themes that WordPress offers.
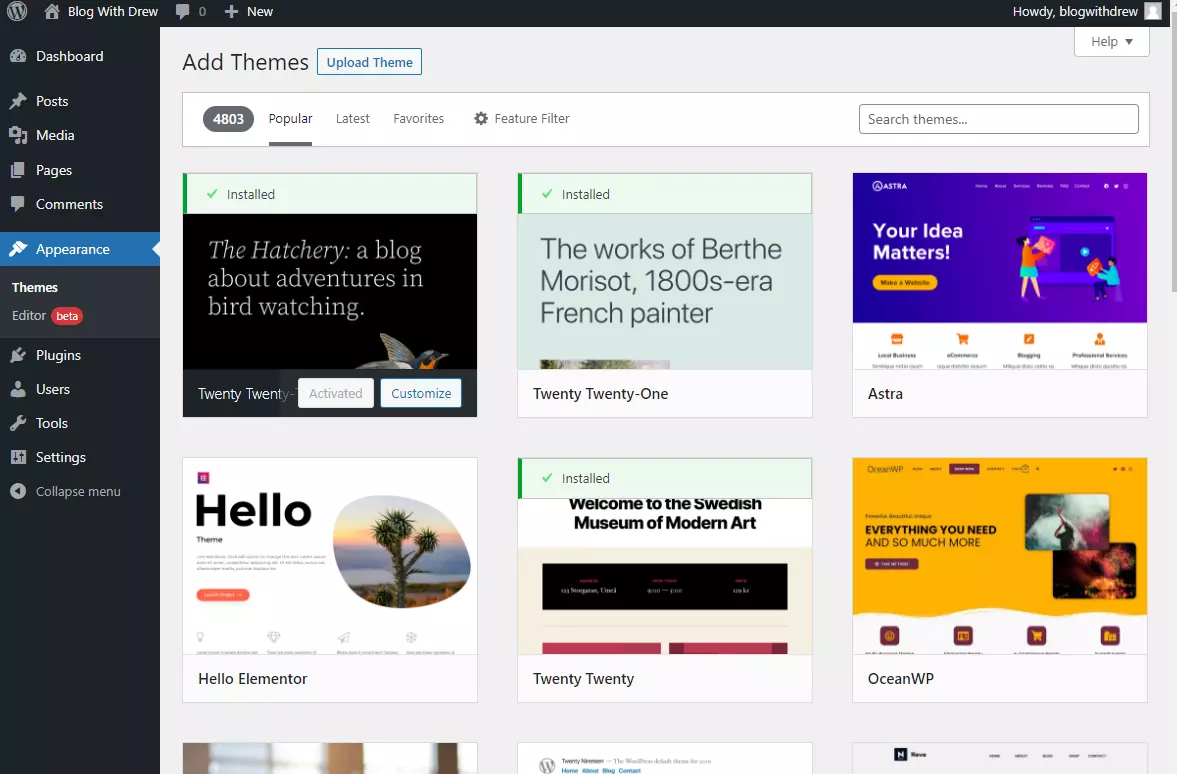
As you can see, there are a ton of free WordPress Themes to choose from. You can even search for a particular theme and use the filter options to find something specific.
If you bought a theme or downloaded one already, you can install it by going to the same spot - "Appearance" / "Themes" / "Add New". You'd then upload the zip file and click install.
That's it! Your theme is fully installed.
Ready to get your blog started with Bluehost and take advantage of my discount?
5. Install Essential WordPress Plugins
Plugins install at the click of a button. They are tools that integrate with your website to add features and customizations.
For those who want extra help or prefer expert guidance, a San Diego WordPress Support service can assist with installing, configuring, and optimizing these plugins.
Your focus, in the beginning, should be on plugins that focus on SEO and speed optimization.
To upload a plugin, go to your WordPress dashboard, click on plugins, then click "upload plugin" and activate. Done.
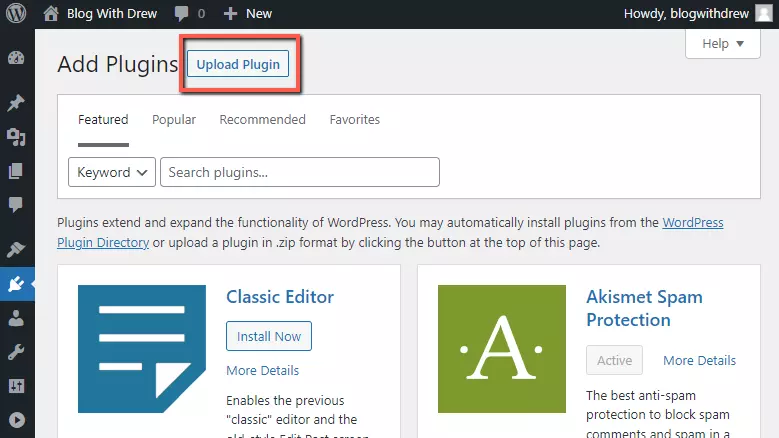
Here are some of the plugins you should be using:
1. Thrive Architect
Thrive Architect in my opinion is the best page builder. In fact, it's the one I use on my site and is the one that built this page as well.
You can use the free "Gutenberg" editor that comes with every WordPress theme, but Thrive Architect is just so much easier, especially for newbies.
2. CleanTalk
CleanTalk is a great plugin to filter out spam comments. You might not need it when your blog is new, but when you start to build traffic, the spam will start and it will get relentless. I use it on all my WordPress blogs and it works well. You can also just disable comments. This way you won't need a spam plugin.
3. ShortPixel
ShortPixel is a plugin that makes all your heavy images lighter by compressing them. This is going to make your pages load faster, giving your viewers a better experience.
4. WP Rocket
WP Rocket is a plug-in that speeds up your site. It minifies HTML, CSS and JavaScript and more.
It's a paid plugin but it's much better than anything I've ever tried. Well worth it at just $49 a year.
5. Yoast SEO
Yoast SEO is the only plugin I use to manage my sitemaps, page and post titles, meta descriptions and more. Rank Math is also decent, but I prefer Yoast as it's all I ever used.
6. Planning Your Content
Now that all the techy stuff is out of the way, the fun part begins!
This is where you start finally start writing and get your first blog post up.
You're in this to make money, so the way you structure your content for each and every page is very important.
Gone are the old days of blogging where you just write about whatever you're feeling or updates in your life.
You need to write content that people are looking for.
In order to accomplish this, each new blog post you write should be structured this way:
The below image will show you one of my posts where I include the keyword "Online Business Ideas" in the URL, Title, and first paragraph.
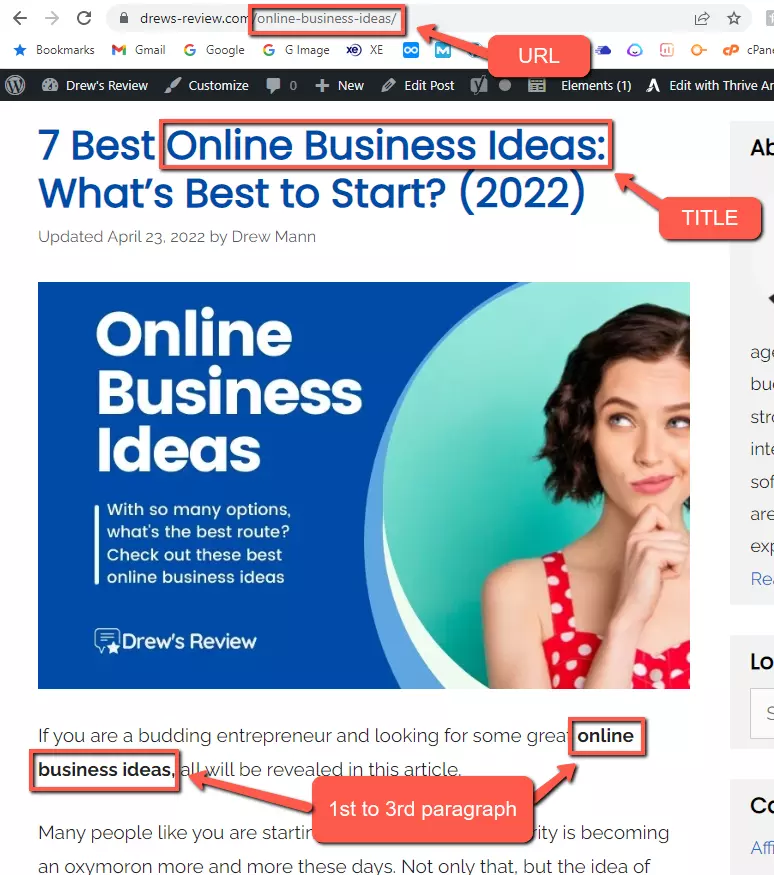
When you start your blog, focus on informational posts only. For example, if your blog is going to be about fishing, then you don't want your first post to be "Best Fishing Lures under $20". You'll want several "how-to" type articles before writing a promotional type post.
When you have a topic/keyword you would like to write about, then enter your keyword in Google and see what the first page is writing about. You will want to closely match the content but don't plagiarize!
This is all about writing by matching Google search intent. If your article is way off what Google wants to see, it won't rank.
How to Write Blog Posts that Match Google Search Intent
Google is the largest search engine in the world, so it's important to make sure your blog posts are optimized to match the search intentions of Google users. There are four main types of search intent: informational, navigational, commercial, and transactional.
Informational intent is when someone is looking for general information about a topic. For example, they might enter a query like "what is global warming?" into Google. To write a blog post that matches this type of intent, you need to provide accurate and up-to-date information on the topic.
Navigational intent is when someone is looking for a specific website or page. For example, they might enter a query like "Facebook login" into Google. To write a blog post that matches this type of intent, you need to include links to the relevant website or page.
Commercial intent is when someone is looking to buy something. For example, they might enter a query like "buy Nike shoes" into Google. To write a blog post that matches this type of intent, you need to include links to products or services that are for sale.
Finally, transactional intent is when someone is looking to buy something. They may be comparison shopping or looking for the best deal on a specific product. Whatever the case, their goal is to complete a purchase.
Now that you understand the different types of Intent, let's analyze this with an example.
I did a search for "how to get rid of dandruff". Notice what I marked with a red box.
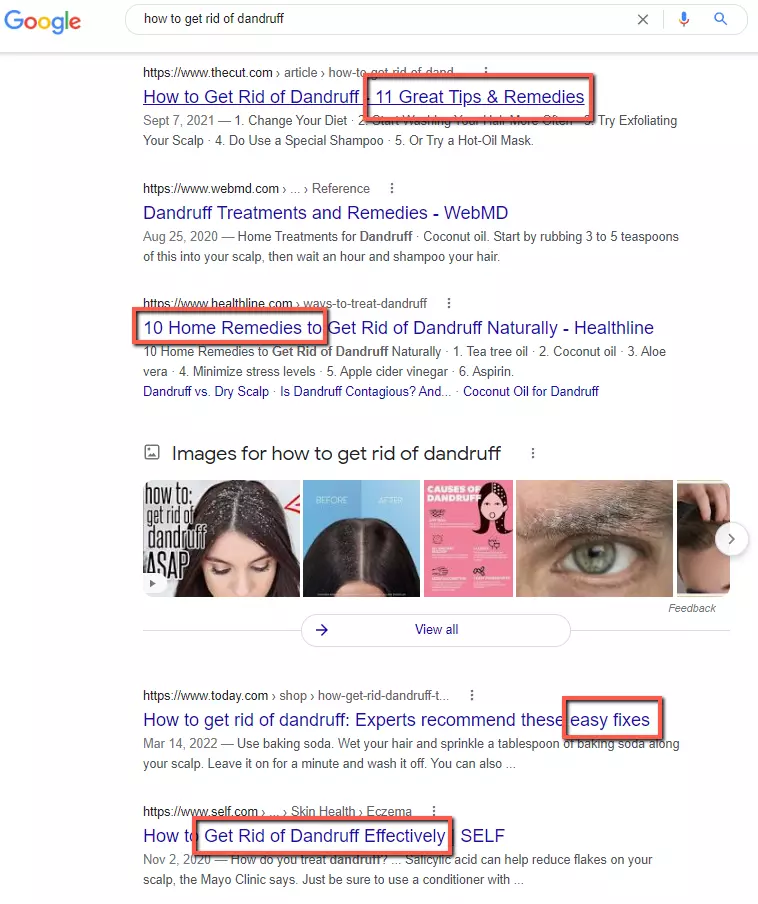
You will see certain buzzwords like "11 Great Tips & Remedies", "10 Home Remedies", "Easy Fixes", "Get Rid of Dandruff Effectively", and so on.
What does this mean?
It means that Google is pushing articles to the top that have a list of tips and remedies to help you get rid of dandruff quickly and effectively.
How would you structure YOUR article?
You will want to get to the point quickly. Write a similar title, and from the looks of it, a list of different home remedies is what matches search intent.
You want to capture your reader right away by just having a quick intro, and then get into the steps immediately.
In the old days, you'd start off by writing something like, what is Dandruff, different types of Dandruff, how to clean dandruff off your clothes, etc. Don't do that. You must start with the solutions first.
You can keep that info later, in the form of FAQs later on. But here, to match search intent your article must mainly be about the ways to get rid of dandruff quickly and effectively.
Makes sense right?
Test this on yourself. Do a search on "How to (whatever you want here)". See how the articles are structured on the first page. Most of them will answer your question right away and not dilly dally much. Articles on page 2 and beyond will likely NOT match search intent well.
That's how you get blasting out of the gate well!
Tips For Writing Blog Posts
A lot of people don't start blogs because they feel they "aren't good enough". Do you fall into this category?
Look, to make money blogging you don't need to write like a pro. You don't even need to have English as your first language. So please don't think that you aren't qualified to write a blog. You definitely are.
Here are some tips to help you improve your writing:
1. Get Grammarly
The free version is good enough. I use it myself and it uncovers a lot of mistakes. (I still need to fix a lot of pages that I didn't run Grammarly through!)
2. Use short, concise sentences
Writing for a blog is different than writing for other formats. When writing for a blog, it is important to use short, concise sentences. This makes your content easier to read and more engaging.
The best way to do this is to keep your paragraphs short- no more than three or four sentences. And, if possible, break up your content into shorter paragraphs. In addition, be sure to use plenty of white space. This will help to break up your text and make it more visually appealing.
3. Try to use words that are not difficult for your audience to understand
When you are writing a blog, it is important to use words that your audience will understand. You want them to be able to read your blog and get the information that they need without getting frustrated.
This means using simple words and phrases that they are familiar with. It also means avoiding jargon and acronyms that they might not be familiar with. If you can keep your language simple, your readers will appreciate it and be more likely to come back for more.
4. Write in an active voice - "I did this" instead of "this was done by me"
When you write in an active voice, your readers will be able to follow your ideas more easily. In addition, an active voice makes your writing sound more personal and less like a textbook.
To use the active voice, simply state the subject of your sentence followed by the verb. For example, "I added detergent to the washing machine." If you're not sure whether you're using the active voice, look for any instances of the word "by" followed by a verb.
If you see this construction, chances are that you're using the passive voice. To revise it into the active voice, simply remove the "by" and move the verb to the beginning of the sentence.
In other words, don't be afraid to put yourself in your writing! Active voice will make your writing more engaging and easier to read.
5. Include details that show rather than tell the story
When you're writing your blog posts, it's important to include details that will help readers visualize what you're talking about.
Rather than simply telling them that your new garden is looking beautiful, for example, show them by describing the colors and scents of the flowers in bloom.
Or if you're recounting a recent trip, instead of simply saying that it was fun, share a few specifics about the places you visited or the things you did. The more sensory details you can provide, the more engaged your readers will be.
So next time you sit down to write a post, take a few extra minutes to really bring your story to life. Your readers will thank you for it.
6. Use H2 and H3 Tags properly
One of the most important things to keep in mind when writing a blog post is to format your headings correctly. Headings are not only important for helping your readers navigate your article, but they also play a role in how search engines index your content.
For maximum SEO benefits, you should use H2 tags for your main headings and H3 tags for any subordinate headings. Keep in mind that all headings should be formatted using proper tag hierarchy; in other words, don't skip from H2 to H4 without first using an H3 tag.
By taking the time to format your headings correctly, you can help ensure that your blog posts are both easy to read and easy to find.
7. Use readable fonts
This means choosing a font that is simple and clean, without any ornate details that can be difficult to decipher. Second, you'll want to choose a font that is size appropriate.
If the font is too small, readers will have difficulty reading it, while if it's too large, it can appear overwhelming and difficult to navigate.
Finally, you'll want to make sure the font you choose reflects the tone of your blog. A playful font can be perfect for a light-hearted blog, while a more formal font may be more appropriate for a business-oriented blog.
8. Provide Value
Each one of your new blog posts should be written in a way that provides value to your readers. This entails writing with a clean structure of a beginning, middle, and ending.
Any topic can be made interesting if you follow this format. Layout the expectations in the beginning, deliver that content then wrap it up in a nice bow.
9. Use bullet points
One way to make your blog posts more engaging is to use bullet points. By breaking down your information into smaller, bite-sized pieces, you can help your readers to digest the material easier.
In addition, bullet points can also be used to highlight key points or takeaways from your post. When used effectively, bullet points can help to make your blog posts more readable and enjoyable for your readers.
Ready to start your blog? I highly recommend Bluehost.
Set up About, Contact, and Home Pages
These are very important pages that need to be visible in your menu bar at the top of your blog or even in the footer (bottom) if you wish. These pages allow users to understand what your blog is about and to find important information.
1. Home Page
Your home page needs to tell visitors in less than 3 seconds what your site is about. You don't want to clutter it with too much information either.
If someone visits your homepage and doesn't understand what your site is about in just a few seconds, chances are they will bounce and never return.
To edit your home page, you can use a tool like Thrive Architect. You don't need to be a web designer. You can get inspiration from other sites and just drag and drop your content blocks onto the page. This includes text, videos, colored blocks, images, and more.
2. Contact Page
Your contact page can either have a contact form or include your email address or Facebook page like I have. If you are going to include your email address, write it like this - drew[at]drews-review.com. This format will reduce spam.
Your contact page is important because people will contact you for a variety of reasons. Don't avoid this step and make sure it's visible in your menu bar.
3. About Page
Your about page should be a very informal introduction to who you are and what your blog is all about.
This is where you should be "down to earth" so that you can build rapport with your readers and connect with them on a deeper level.
You can write about:
4. Privacy Policy Page
A privacy policy page is important for any blog because it sets out what information you collect about your readers, how you use that information, and what choices readers have about how their information is used.
A well-written privacy policy will build trust with your readers and help you to avoid legal problems down the road. If you don't have a privacy policy page on your blog, now is the time to create one.
You don't have to write it yourself, just Google "Privacy Policy Generator" and you can the content for free to use on your site. Just make a few tweaks and you're done.
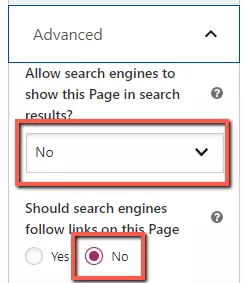
It's important that you mark your "Privacy Policy" page as "no-index", "no-follow" This basically tells Google you don't want this page indexed.
To do this, go to the Privacy Policy page while you are logged into your site, click "edit" at the top, then look for "Advanced" on the right side of the page.
Choose "no" and then click "no" again as indicated here:
You might even consider doing the same with your "Contact" page but that's optional.
Future Content Planning for your WordPress Blog
You are probably wondering what you should write about when you finally start blogging.
Your posts are going to be based on targeting keywords. This is based on keyword metrics such as volume and difficulty.
In the beginning, you could focus on longtail keywords which are easier to rank for.
Check Your Blog's Performance
Once you have several posts up, you'll want to start analyzing your content. To do this, you should set up Google Analytics and Search Console. These are both free from Google but you will need a Gmail email address to log in.
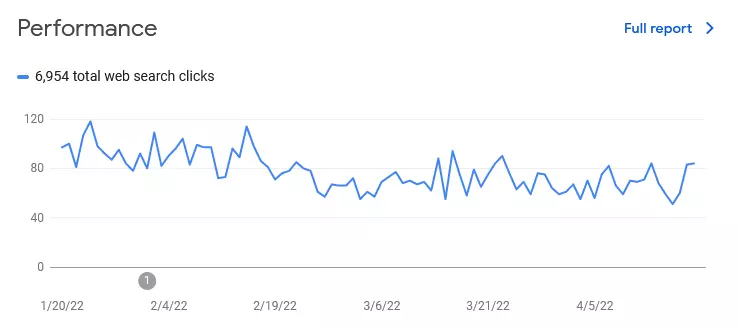
With Google Search Console, you can see metrics like your blog's performance, Core Web Vitals, get updates on any errors with your site, and more.
With Google Analytics, you will be able to see site visitors, page views, average time on page, and much more right in your Google Analytics account.
There are also paid tools to check performance. Ahrefs for example, allows you to check not only rankings but any backlinks to your site and keywords you are ranking for.
For tracking keywords that you are ranking for specifically, you can get the basic and free package for Pro Rank Tracker. It will allow you to track 20 keywords for free. You can upgrade later to the paid plan once you start ranking for more.
7. Promote Your Blog
The best way to promote your blog is with links.
When you have links from relative and authoritative sites pointing to yours, this shows Google that your site is important.
The more you have, the better.
But how do you do this? Here are the strategies you can use, starting from the easiest.
1. Social Fortress
Every reputable site will have a Facebook, Twitter, Instagram or even Youtube page. These pages are easy to create and you can link directly from them to your blog. These are the first links you will create.
2. Haro Links
Haro stands for "Help a Reporter Out". You can register for free here. Once you register, you will be sent 3 emails a day. In these emails, you will see separate entries to respond to. Each of them is asking a question to get feedback on. Choose from ones that are relative to your niche and respond to them.
If they decide to publish your answer, you will get a link back to your website. Some of these links come from high authority sites like Forbes, Entrepreneur.com, Reuters and more. Imagine scoring a link from one of these!
Now, I know what you are thinking. How would they take you seriously if you are just starting out?
This is why you should have at least 10 blog posts up, have your site looking as good as you can, have your about/contact pages done, etc.
They won't care if you're a new site. As long as you look reputable that's all that matters.
Want to be a pro at Haro link building? Check out the Haro Masterclass.
3. Guest Blogging
Guest blogging is where you reach out to other bloggers or websites and ask if you can write an article to have posted on their site. In your article, you will include a link back to your blog.
This strategy involves cold emailing and relationship building.
The important thing to remember here is that you have to provide value. You can't just reach out to someone and say, "Hey, do you accept blog posts?"
You should personalize your email by seeing what topics they don't write about but their competition does. You then recommend some topics to write guest blog posts about. You'll have much more success this way.
4. Teaming up With Other Link Builders
Once your site starts to get traction, you too will start to receive emails from others wanting to submit a guest post. You will politely decline but offer them an opportunity instead.
You simply tell them that you are actively engaged in seeking guest posting opportunities and can "sneak in" a link for them in a future guest post that you will write. Obviously, you will include yours as well.
They would then do the same for you. You can both track your results so it's even. Voila!
How to Start a Blog Summary
Starting your own blog is actually pretty easy as you can see and the pros outweigh the cons.
The difficult part is the content strategy and link building. To see real success, it's going to come down to your content publishing and link building efforts.
The more content and authority from links that your site gets, the easier it will be to rank. Some posts won't even need links to rank on page one after your blog gets some authority.
Let's do a recap of the steps involved in how to start a blog:
I realize that for some this all seems overwhelming. It was for me too when I first started. However, once you have everything in place, it's just a matter of writing content and getting backlinks. That's it.
Mindset is really important here. This is because it will take some time to make money with blogging. You should expect to see a few dollars come in after 3 months. Each month after that it should continue to grow as long as you're adding content and getting more traffic.
Need training? Find a course that fits your budget.
- AIVille Review: Everything You Get, Pros, Cons, and My Honest Verdict - January 22, 2026
- Innovative Methods for Personal and Professional Choices - January 19, 2026
- Boosting Business Growth Through Consistent Call Management - January 18, 2026

Hi Drew,
Have you haver bought a blog/website? Do you see it as good investment? if so do you recommend any course ?
Thank you!
Hi Jorge,
Yes I have. It can give you a headstart especially if there are some powerful backlinks pointing to it. It’s a good investment as long as you’re not overpaying. As for courses, check out my affiliate marketing course list to see which one works best for you. Courses that suck or are sub-par did not make this list. I only recommend quality courses.
Hi Drew,
This is very impressive step by step guide of how to start your blog and I think as an old bloke of 69 you will certainly help me get this up and running.
Take care
Andrew
Glad you liked it Andrew. It’s really not that difficult 🙂