Do you need to grow your business by pumping out a lot of content but don't have the time or budget to hire a team of writers?
Enter Boss Mode - the feature by Jasper Ai that allows you to take control of Jasper and write 5x faster. And, content that is 100% original and well written.
When you activate Boss Mode, you are able to control Jasper by using Jasper Commands. This means you have to ability to "tell" Jasper to do exactly what you want.
When I signed up with Jasper Boss Mode back in November 2021, I really didn't know how to use it. It took a while to understand the commands but when I did, it really showed what Jasper Boss Mode can do.
That's why I am writing this article so you know exactly how to use Jasper Boss Mode.
If you don't have Jasper AI yet and are considering, it, hop on over to my Jasper review first. That way you'll learn if it's for you or not.

What is Jasper Boss Mode?
Jasper Boss Mode is Jasper.ai's most popular plan. It allows you to take control of Jasper AI and turns him into your own personal copywriting assistant.
When you activate Boss mode, you simply enter a command in the editor and Jasper will write exactly what you direct it to. The output is some really great targeted content based on your query that you can use for writing long-form content that is 100% unique and high-quality.
If you're paying a lot of money for writers, Boss Mode can literally eliminate that cost.
If you write the content yourself from scratch, Boss Mode is going to be your newest best friend. This is because you'll no longer suffer from writer's block or lose inspiration. Jasper Boss mode can come up with the content for you, you just need to direct it in the right way.
How Does Boss Mode Compare to the Starter Plan?
Besides Boss Mode being the more expensive plan (I'll get into pricing later) the main difference between the two is that Boss Mode was created with long form content in mind. In other words, if you're just doing short copywriting for ads such as headlines and descriptions, then the Starter plan is all you'll need.
But if you want to write blog posts, long content, ebooks, or even write a book (yes you can write a book with Jasper AI boss mode!) then the Jasper Boss Mode plan is what you need.
So Boss mode is not just about being able to "control" Jasper with commands, but it's for those that actually need a LOT of content written.
What Features are Included With Jasper AI Boss Mode Not Found in the Starter Plan?
Aside from what I mentioned above, there are a lot more features available with Boss Mode compared to the Starter plan.
Let's go over those features.
1. Character Lookback Much Greater Compared to the Starter Plan
With the starter plan, Jasper is only able to read the previous 600 characters you have written. With Boss Mode, Jasper can read up to 3000 characters.
What is the benefit of this?
There's a lesser chance of repetition, which is something you'll see more of with the starter plan. This is a great help especially if you don't have an unlimited word count plan.
Jasper understands the content better due to a higher read count, so it will be able to expand on the topic more.
It will save you time because, with better content, there is less focus on deleting and editing outputs.
2. Ability to Format Your Content in Documents
Jasper Boss Mode has an editor not found in the Started Plan. It allows you to edit and format all of your documents. Think of it as Microsoft word or Google Docs on steroids. This is where you'll be using all your Jasper Commands to write content which we will talk about next.
3. Jasper Commands
Jasper Commands is what makes using Boss Mode so enjoyable. You literally just tell Jasper what to do, and Jasper will respond appropriately.
All of this is done inside the document editor.
To give you an example of just one command you can do, let's just say you want to write an introduction paragraph for a blog post titled "How to choose the right lawn sprinkler."
There are a few ways to approach this. You can either just write "write an intro paragraph on how to choose the right lawn sprinkler."
Or, you could have the title written already and below that just type something like, "write an intro paragraph for the above."
After that, you just hit CTRL + Enter on a PC or CMD + Enter on a Mac.
And just like magic, Jasper will write you a perfectly crafted introduction paragraph. It's important to understand that you don't need exact wording for commands either. As long as it makes sense, Jasper will understand.
Jasper commands is much more than that though. YOu can use it to generate not just intro paragraph's but everything in the body of your content and in your conclusion as well.
Writing blog posts isn't the only thing Jasper Commands can do. You can also use commands for marketing emails, headlines, ad copy, eb0oks, and even a complete novel if you wish!
4. Integrate SurferSEO for the SEO Mode Function
If you are a SurferSEO subscriber, you'll be pleased to know that with a toggle of a button you can integrate SurferSEO with Jasper. This allows you to optimize your article within Jasper without having to switch back between the two tools.
To integrate SurferSEO with Jasper, just click on the toggle button:

5. Create Recipes to Streamline Your Writing
With Recipes, if your content normally follows a certain structure, you can use Recipes to create repeatable instructions for Jasper. You'll even find Recipes created by the community that you can use or contribute to.
6. Correct Spelling and Grammatical Errors With Ease
With the Boss Mode plan, Grammarly basic is built right in. I found this really handy because you can fix any spelling or grammatical errors inside your doc before transferring to your live site. There is no additional cost for this as it's the same was what you'd get with the free plan from Grammarly.
How Much Does The Boss Mode Plan Cost?
The Boss Mode Plan starts at $49 a month if paid annually. If you choose the monthly plan, it will cost $59 each month.
Choosing the annual plan saves you $120 a year.
With this plan, the amount of words you can have Jasper write in a month is capped at 50,000.
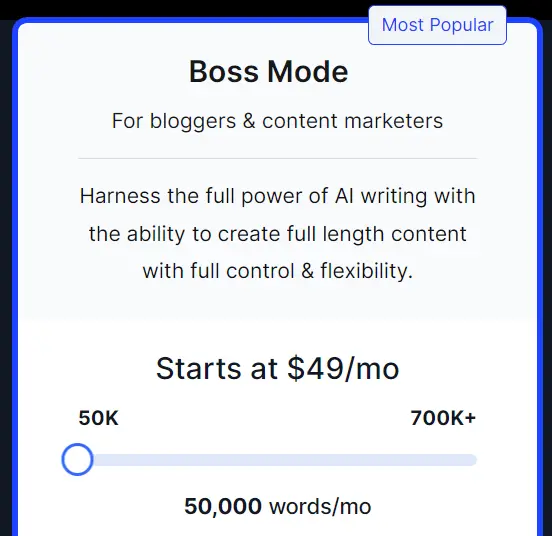
From here, the plans get more expensive depending on how many words you will need to be written per month.
Keep in mind that this doesn't just include the "usable" words. The word count includes all the words Jasper writes regardless if you use them or not.
That being said, the next plan starts at $82 a month which includes 100,000 words. For up to 300,000 words, it will cost $232 a month. At 700,000 words, it will set you back $500 a month.
I think you get the idea here on pricing. Better make those words count or it can get expensive!
You can take Boss Mode for a test drive by getting the Jasper AI free trial which includes Boss Mode. Try it free for 5 days.
How to Use Jasper Boss Mode Step by Step
I am now going to show you how to use Jasper Boss Mode step by step. You will learn how to create long form content easily which you can use for blog posts, writing a book or anything else.
Step 1: Open Documents
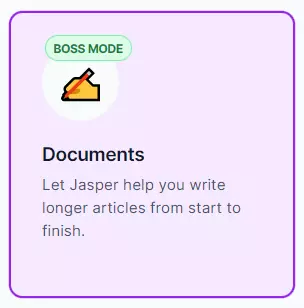
Click on "Templates" found in the left-hand panel of Jasper. Then, the first one you'll see is "Documents." Click on that.
Step 2 - Choose an Option
After you click on "Documents" you'll have two options:
- Start from scratch - This brings you straight into the editor
- Blog post workflow - This helps you come up with a title and Intro paragraph. I suggest using it because it comes in really handy.

Since I prefer using the Blog post workflow, let's use this option to see how it can help you create titles and an intro from scratch.
After clicking on Blog post workflow, the first thing you will do is tell Jasper what you want to write about. For this example, I wrote "write a blog post on how to download YouTube Videos." The key here is to be as direct as possible with your instructions. Don't get too detailed because shorter commands produce better results.
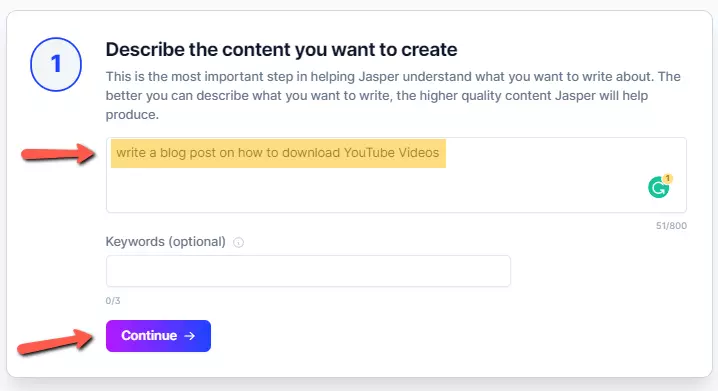
You also have the option of using "keywords" but I've had a lot of success without using it so here I just left it blank.
After you are satisfied with the instructions, click on "continue."
You can then have Jasper write a Title or if you have one in mind, enter it here. I suggest to let Jasper do it. It comes up with some pretty good titles which you'll see.
I am going to let Jasper create some title ideas for me. Here is what I got:
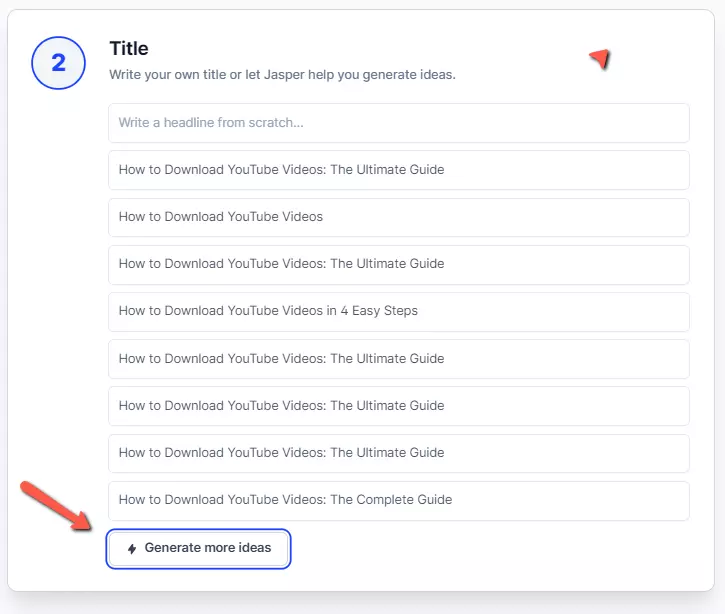
These are some great titles I can use in the blog post. If you're not happy with them and want to see more, just click on "Generate more ideas" to get more title suggestions.
If you're happy with one of them, highlight the one you want, and click "use this one."
Be sure that the title is 60 characters or less before choosing it. This is because if it's longer, the end will get cut off when it displays in Google search. You want the entire title to be displayed.
You can check character length first using the Moz title tag tool.
Jasper does a pretty good job keeping it under 60 characters though. I haven't seen one yet that has gone over so just use the Moz tool just for OCD purposes. 😅
After you have chosen your Title, Jasper can then write an intro paragraph for you. You can either write your own, but I prefer to see what Jasper has to say.
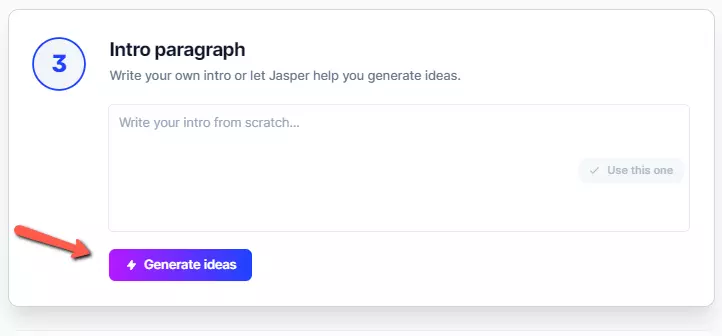
After clicking "Generate ideas, here it what Jasper wrote:
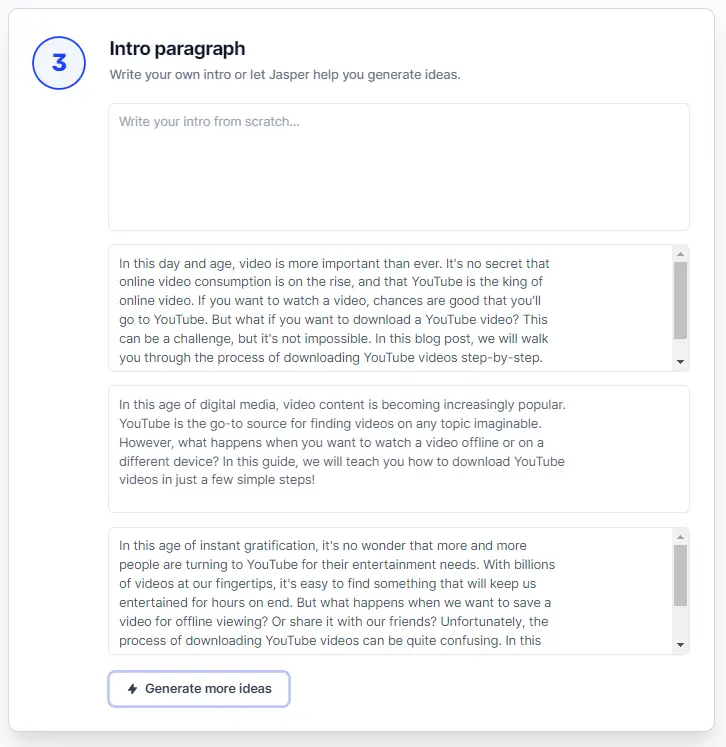
The results are pretty damn good and plagiarism free. You can generate more intro paragraphs, write your own or choose one that Jasper wrote.
Once you make your selection, click on "open editor."
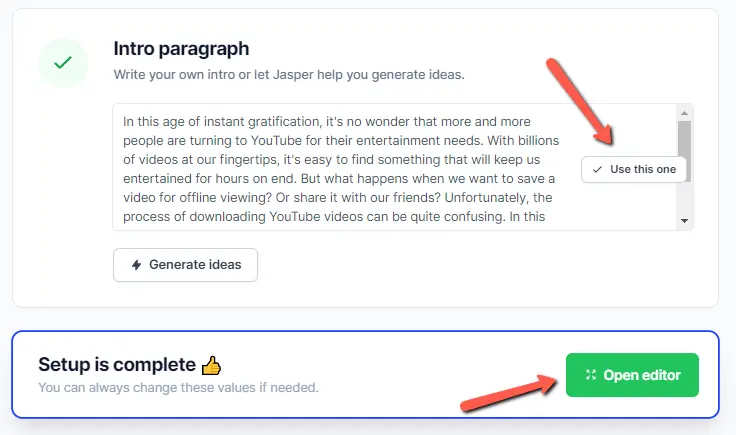
The editor will then automatically open and will drop in your intro paragraph. And just like that, you've got a title and a great intro to start with.
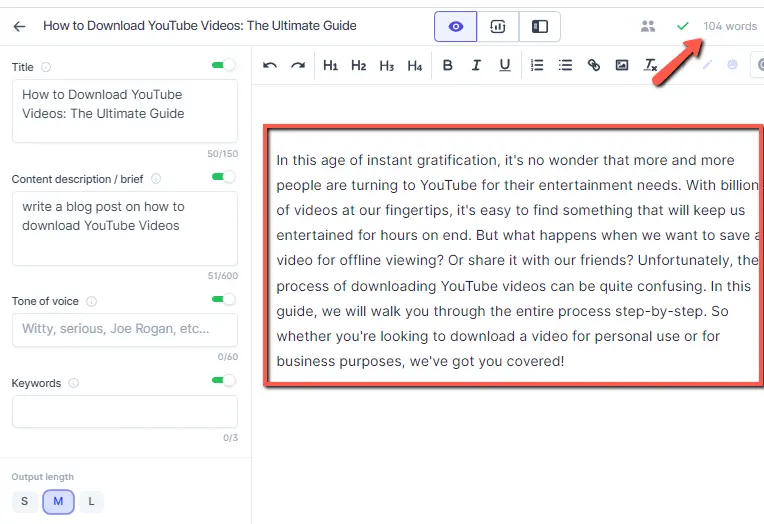
Keep in mind if you have a title and intro paragraph in mind already, or if you'd just rather use the Jasper commands to come up with them, then you can forego the above steps. Just choose the "start from scratch" option instead.
Step 3 - Provide Context For Jasper
Now that you're in the document editor regardless of which of the above options you chose, it's time to provide Jasper some context so that he will understand better what your article is about.
It's important that you are very clear, short sentences always work best. The clearer you are, the better your content output will be.
This is what you'll see in the left hand side of the editor:
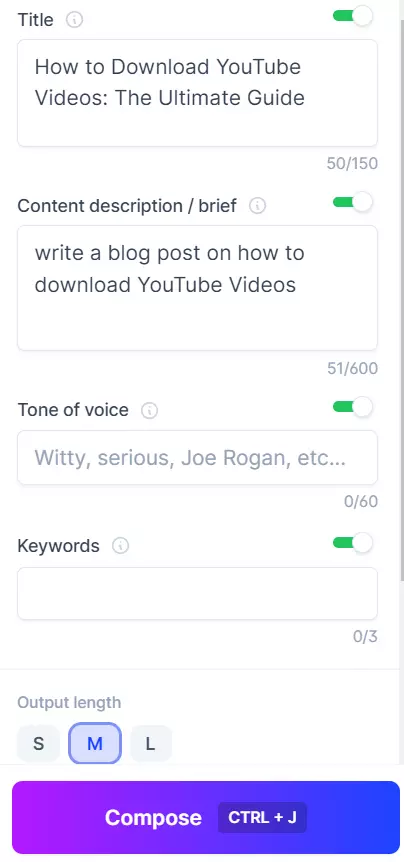
You'll notice that Jasper already filled out the title and content /description brief. This is because I used the Blog Post Workflow option. If you choose "start from scratch", these would be blank.
Now, I will go over what each of these sections mean.
Did you notice there is a toggle on each of these elements? They are there because while you are getting Jasper to write your article, you can turn them off so it can't be read.
Why would you want to do that?
You would do this if you want to have Jasper go in a different direction when it comes to your content. It will ignore those inputs and write based soley on what you tell it to write.
At this point, you're ready for one of the most powerful things Boss Mode has to offer which is Jasper Commands.
Step 4 - Choose a Mode to Write in - Or Use all
With your subsription to Jasper Power mode you will get 3 different options on how to create your document. This is really handy because you can either just focus on using one mode entirely, or you can use all 3 to create a masterpiece article. Let me explain what these modes do.
There are 3 different mode options you can use.
- Focus Mode
- Power Mode
- SEO Mode
In Focus mode, everything you have seen so far has been used with this mode. It helps you focus on the document that you are writing at the moment.
In Power mode, you get access to all of the templates on the left pane, with commands next to that and on the right the document area.
Power mode is used when you want to get super specific in one part of your document.
To access it, just click the "Power mode" icon at the top:
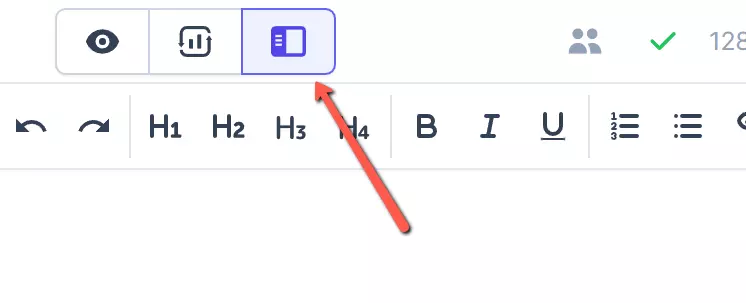
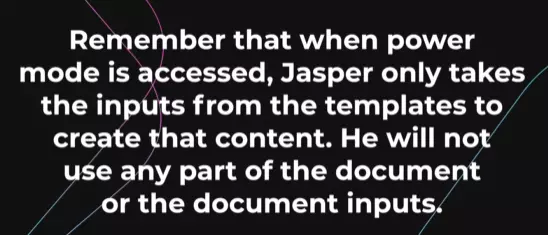
In Power mode, only use it when you want to get super-specific on a particular part of your document. Jasper is not going to read any part of your existing document. He only sees the inputs from the templates.
Power mode is great to use when you want to expand on a particular topic within your article. This is especially true when it's not going in the direction you want it to go while in Focus mode.
To access SEO mode, click the "Surfer" icon in the middle.

SEO mode leverages SurferSEO.
SurferSEO is a tool that optimizes your on-page SEO to help you rank higher on Google. To learn more about it, check out my in-depth SurferSEO review - and yes. i'm a member of the product too.
Jasper has teamed up with SurferSEO to help you optimize your content right in the editor. It itegrates Surfer into the Jasper editor in Power mode. You'll then know what keywords to include, headings to include, about how many words you should write and more. This is all based on competition ranking for similar content on the first page of Google.
Here's what it looks like:
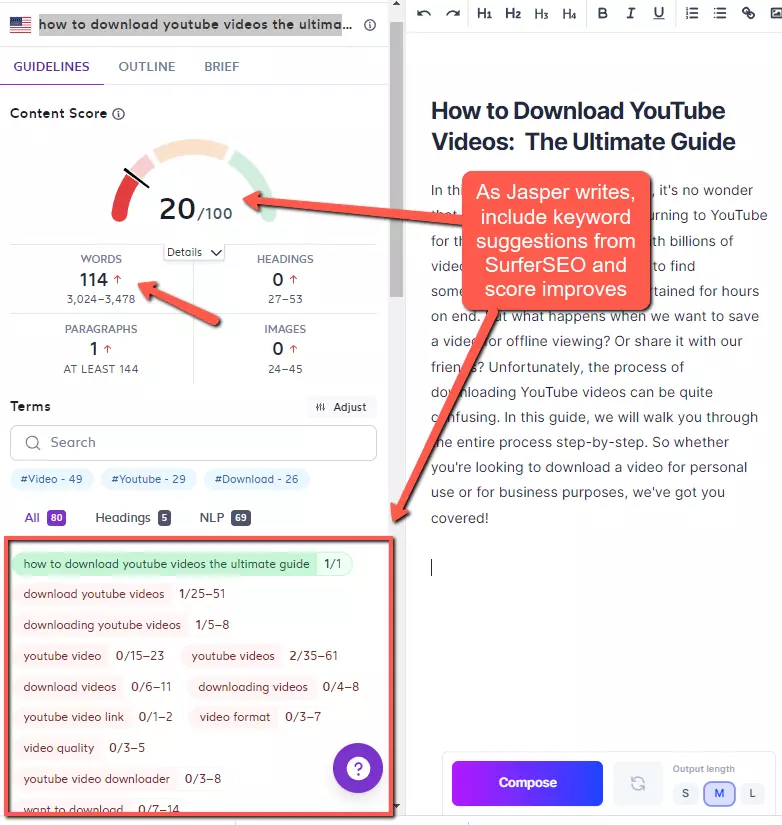
Again, you won't be able to use SEO mode in Boss mode if you don't have a SurferSEO subscription.
If you don't plan on getting SurferSEO, at least check out their free Chrome extension which you can get here.
When you switch between all 3 modes, your work is saved. You don't need to start over again when switching modes. This makes it easy to craft the perfect article using modes that work for a particular part of your article.
For the most part, you can just stick with one mode that you prefer.
Step 5 - Using Commands - The holy Grail of Jasper Boss Mode!
So now that you understand the three different modes you can use to write in, let's talk about commands.
Commands is what makes Boss mode so powerful because it's like having an employee. You simply tell him/her in simple English what you want done.
You can use commands in power mode, seo mode and focus mode. Commands do act differently in each of these modes which I will explain later.
But first, let's answer two questions you probably have. What commands does Jasper understand and how do I use them?
Commands You Can Use That Jasper Will Understand
For the most part, Jasper will understand any command you give him. He understands some commands better than others, but here are some examples of the most common ones:
- "Write some blog post titles about pool maintenance"
- "Write some ad headlines on the product description"
- "Create an outline" (this command will create an outline of topics for your article
- "Write a video script outline for a video with the title "10 Tips for Pool Maintenance"
How to Run a Command
After writing your command in the document window, make sure your curser is just right of the command and then Press CMD + Enter on a Mac or CTRL + Enter on a PC.
It's important to understand that what Jasper sees and uses when running a command.
Jasper will see:
A list of Jasper Commands You Can Use
Remember that Jasper will understand pretty much any command you give him. But, I understand that you might want to know what commands work best.
Here are some example commands that work best for each particular type of document. These are examples that you can customize for your own purpose.
Blog Posts
- Write three blog post titles based on your keywords and topic
- Write a content brief about [your topic, title, keywords]
- Write a list of section headings about [insert your topic]
- Write an introduction about [section heading]
- Rephrase the content above
- Write an outline for my blog about [insert topic]
Questions and Answers
- Create a list of questions and answers about [insert your topic]
- Write some FAQ's about [your blog post topic]
- Give me some questions about [insert your topic]
- Answer the question, "how much calories should I consume in a day?"
Summarizing and Conclusion
- Summarize what will be covered in this content based on [insert outline title 1, 2, 3 etc]
- Write a blog conclusion based on [outline1,2,3, etc]
- Write a summary of the above content in 3 sentences
Videos
- Write a video script outline for a video with the title [insert your title]
- Write some YouTube titles about [your topic]
- Write a video description for the video script above
- Write a video script outline for a video with title [insert video title]
Social Media
- Write an attention grabbing Instagram caption about [insert topic]
- Write a Twitter thread about [your topic]
- Write a Facebook post about the topic above
Company
- Write a tagline for the above company
- Write a mission statement for the above company
- Write a meta-description about [insert your topic]
- Write a feature benefit for [insert feature description]
- Write a customer review of [insert your product] in the first person format
Improving and Re-writing Content
- Rephrase the paragraph above so it's more readable
- Rewrite the above paragraph to explain it to a 5th grader
- Run the Content improver on the above paragraph
- Remove sophisticated vocabulary on the above
Step 6 - Generate Your Content Outline
At this point you should already have your Title and intro paragraph in the document window.
So what's next?
This is where you are going to use Jasper Commands to write a content outline. The easiest way to do it is simply type "write an outline" just below your intro paragraph.
It will look something like this:
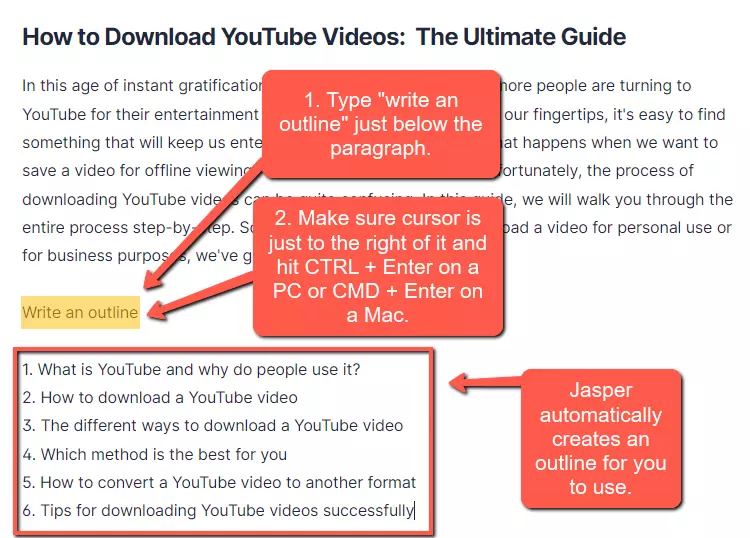
As you can see from the above image, Jasper has written a pretty good outline for you to use in your article. All you need to do next is just expand on each of these points.
To do that, make some space between the first and second heading. Below the first heading, type the command "write a paragraph on the above sentence" as shown below.
You then place your cursor right after the sentence and then run the command by hitting CTRL + Enter on a PC or CMD + Enter on a Mac. By the way, from now on when I say run the command, it's by hitting those keys, just so I don't have to keep repeating myself. 😉
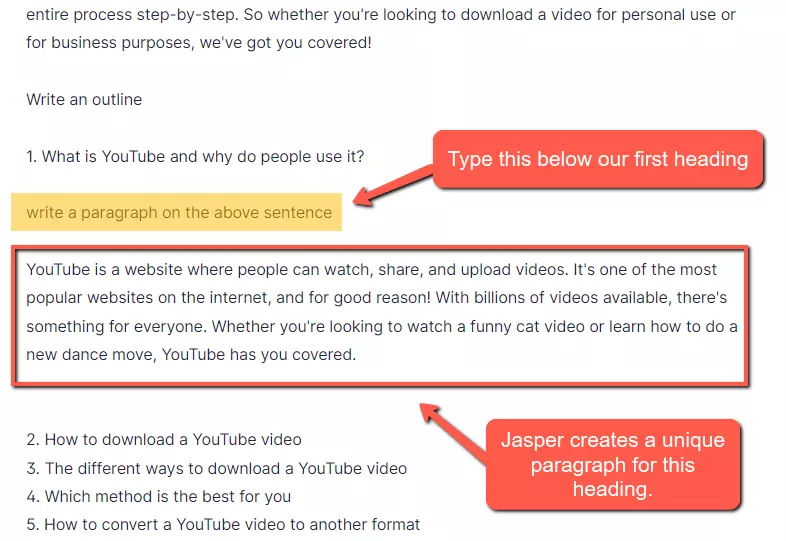
As you can see, Jasper has created a paragraph on your first heading.
But, what if you want more content? This is where the "Compose" button comes into play.
With the Compose button, Jasper will continue writing based on the content above it. Here, I clicked composed and Jasper wrote another paragraph based on the first heading.
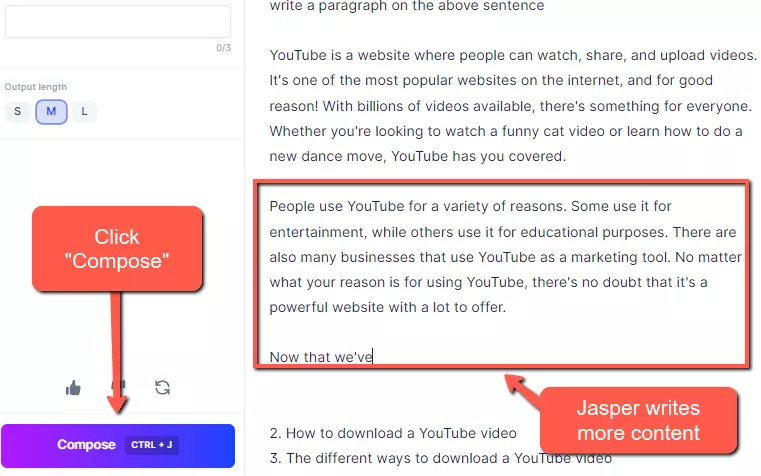
There is a difference between "Compose" and "Commands". This is what many people get confused about. Think of "Compose" as a "write more" feature. It simply expands on based what is written above. It just does that one thing. Commands are different because it's used to tell Jasper what you want it to do.
The compose button also has a keyboard shortcut which is CTRL +J on a PC and CMD + Enter on a Mac
So, all you do next is repeat the same process for each heading.
If you want more headings to expand on, bring your curser just below your intro paragraph, type "write an outline" or "create an outline" (Jasper will understand so you don't have to say it a certain way) and then run the command for more results. Then just repeat the same process again for each heading.
Once you've reached your desired word count, you can then start to generate a conclusion.
Alternative Method For Writing Blog Post Content using the Paragraph Generator
The content example I have shown you above can be written in both SEO mode and Focus Mode. But what about Power Mode?
If you really want to laser focus on the content for each paragraph, you can use the paragraph generator found in Power Mode.
With the paragraph generator, you simply enter in what your paragraph is about, include some keywords (optional), include an optional tone of voice, choose how many outputs you want and then click on "Generate AI Content."
Here's an example:
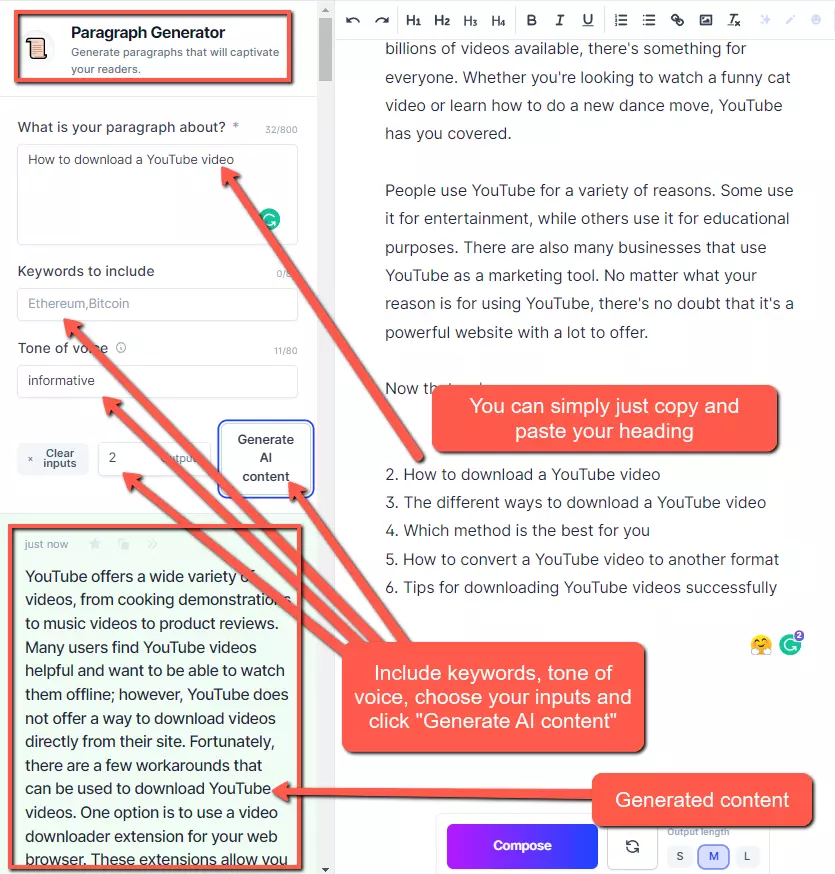
So what's unique about Boss mode is that there are different ways to do similar things. As we can see from the above image, you can just generate paragraphs using the paragraph generator without using a command. Then you would just copy and paste the result you like in the document window.
I found that either way works well and it just comes down to preference.
So there you go, Here was two ways how to generate plagiarism free content using Jasper Boss Mode.
Step 7 - Generate a Conclusion
There are a couple of ways to generate a conclusion which I will go over next.
Method 1 - Using the Blog Post Conclusion Paragraph tool in Power Mode.
- In Power Mode, select "Blog Post Conclusion Paragraph" on the left had pane.
- Then, enter in some of the main points or outline of your blog post.
- Optionally, you can enter a call to action, to get some engagement on your post.
- Enter your tone of voice (optional)
- Choose your outputs (1-15 max. I found 2-3 is all you need)
- Click Generate AI Content
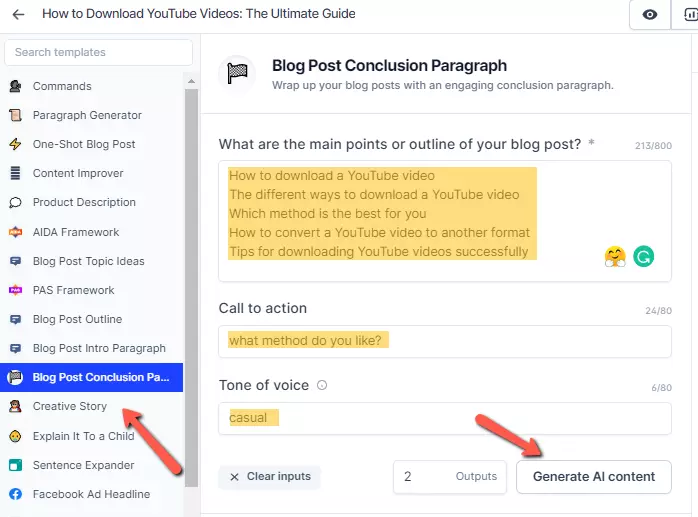
In looking at the image above, I simply just copied and pasted my blog post outline, included a call to action and wrote "casual" as the tone of voice.
Jasper wrote a perfectly crafted conclusion paragraph. Since I chose 2 outputs, I have two options to choose from. Check them out:
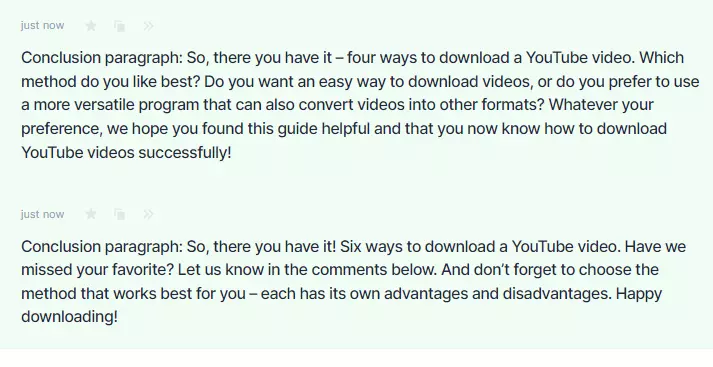
What do you think? I think they are pretty dang good wouldn't ya say? If I was writing this article I would likely use the first one as I think it's better.
Method 2 - Using Commands
If you're going to use commands for your conclusion paragraph, it's a little different. Some might way backwards.
What you will do is after you have generated your outline and before you start generating the body of your article, you'll write the conclusion first.
Why? This is because Jasper will use your outline to create a conclusion, just like it did in the previous step using the Blog Post Conclusion Paragraph generator.
To to this, you can type a command like, "write a conclusion paragraph for the above content."
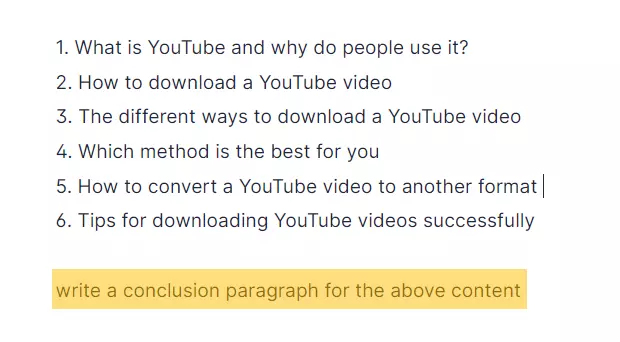
And here is the result:
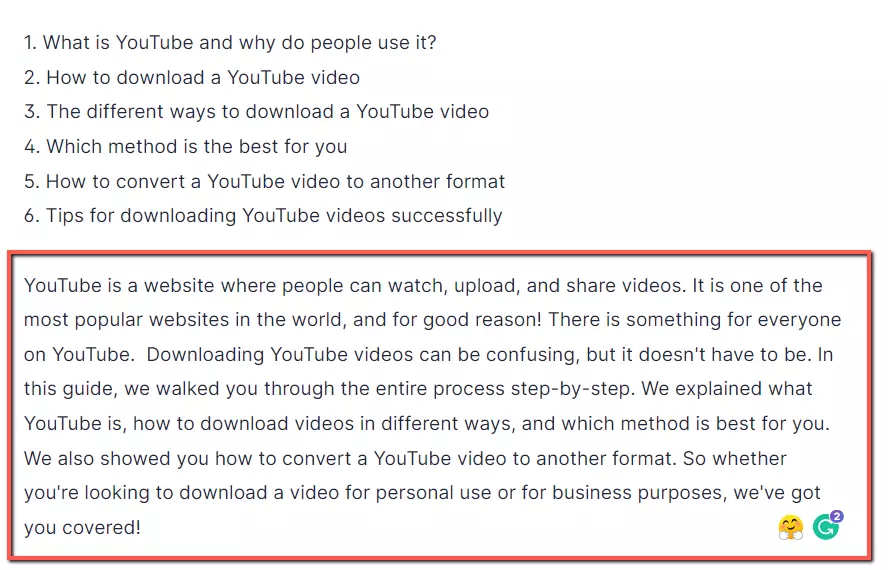
Which one do you like better?
Personally I like them both. You can experiment between the two quite easily to see which one generates a better conclusion paragraph.
One thing I will say is that the conclusion paragraph generator does give you more options such as tone of voice, a call to action and the amount of outputs you can choose. With commands, you just get one generated paragraph.
There is no better option here, just try them both if you are not liking the outputs with one of them.
How to Use Recipes In Jasper Boss Mode
What are recipes?
Although Jasper could craft a sweet recipe for an amazing chocolate cake, it's not what we are talking about here. 🤩
Jasper Recipes are pre-built workflows that are based on a framework where you can run a series of commands. These are run in a seqence which generates content in a very rapid way.
You can use recipes for things like a landing page, a video sales letter, a blog post or even a chapter in a book. There's a recipe for almost anything!
How Can Recipes Help With Creating Content?
The key to recipes is rapid content creation. No more fumbling around to think of what command you should use next.
If your content usually follows a certain format, then recipes are goign to speed up that production.
It also keeps you on track by maintaining structure, quality and efficiency in your content creation.
How Are Recipes Used?
There are two ways do this. You can create your own, or you can use pre-built recipes that you'll find in the Jasper community. First, let's see how to create your own. Click on Recipes on the left.
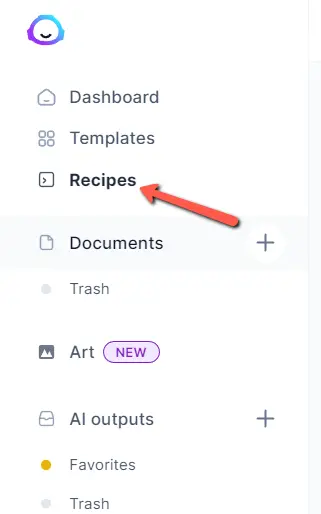
You'll then be presented with pre-built recipes you can use. Currently there are 9 of them. You can use these as a guideline to build your own.

You can also use the Jasper Community for more recipes. If you're feeling generous, you can even share your own here.
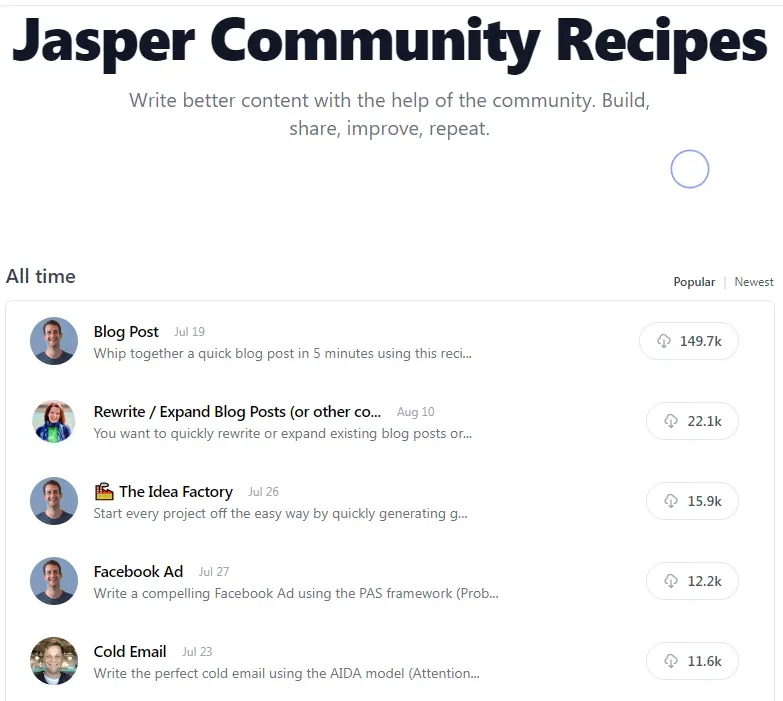
Here is what a recipe looks like. Keep in mind this is just one example, but you'll get an idea of what the commands look like:
>write a brief for {TOPIC}
>write blog title ideas
>write an introduction
>write a blog outline
>write about {OUTLINE_ITEM_1}
>write about {OUTLINE_ITEM_2}
>write about {OUTLINE_ITEM_3}
>write a blog conclusion on {OUTLINE_ITEM_1}, {OUTLINE_ITEM_2}, {OUTLINE_ITEM_3}
To use a recipe, you simply just choose the one you want and then click "open recipe."
The next step is to click "Run."
All you have to do next is replace all the variables - see above. For example, in the first one you'd enter your topic in {TOPIC} and your first online in {OUTLINE_ITEM_1}
After that, you would just run the commands - CTRL + Enter on a PC or CMD + Enter on a Mac for each one.
And like magic, Jasper has created your document in a matter of minutes.
Conclusion
I hope by now you have seen the power of Jasper Boss Mode and how to use it. If you have Boss mode already and not sure how it's used, I hope you got something from this guide.
To just recap on some of the advantages of Boss Mode, it can:
- Help you write long form content
- Help you write much quicker
- Gives you the power to control Jasper in the way you want
- Makes your life much easier by using commands, recipes and all the different tools available.
So why not give Jasper Boss Mode a try?
- Best Ways to Make Passive Income on YouTube - April 15, 2024
- How I Make Faceless YouTube Channels With AI - April 9, 2024
- Top 21 Faceless YouTube Niches to Earn Big Profits in 2024 - April 3, 2024
